• Home
    • Recipes
    • The Roast Chicken Project
    • Allie Dreams of Cake
    • Sunday Suppers
  • Travel
  • About
Menu

Tea and Fog

Street Address
City, State, Zip
Phone Number

Your Custom Text Here

Tea and Fog

  • Home
  • Recipes
    • Recipes
    • The Roast Chicken Project
    • Allie Dreams of Cake
    • Sunday Suppers
  • Travel
  • About

Small Thanksgiving: Crispy Fried Chicken with Sage & Caper Gravy

November 3, 2020 Allie
Crispy Fried Chicken with Sage Caper Gravy

Every year, once Halloween is over, I am in full holiday mode, ready for my favorite holiday, Thanksgiving, and then Christmas. But, this year, it does not feel like we are moving seamlessly into holiday-mode, no matter who decrees it.

Of course, we have to all get through today first, right? (Please vote!)

But then next week, and after that, and after that, what are your holiday plans? We all still have to deal with the idea that holidays are going to be a little smaller this year, probably without extended family and for a lot of people, probably only for 2 or 3 eaters. For a holiday like Thanksgiving, especially, how do you plan for that? Most traditional menus call for a table laden with heavy dishes, all ready to serve 8-10.

So, I thought this year, I’d share some ideas for what I’m calling Small Thanksgiving. Recipes that are meant for only 2-4 people, and with some non-traditional twists on the classic menu, because I needed to have a little fun and I’m not really in the mood to pretend anything about this year will be traditional. I think 2020 is the perfect time to go rogue!

First up, the bird! It’s really hard to buy and cook just a small amount of turkey in November, so I nixed that idea entirely. I know friends who are planning to make ham or beef, and I think my own small celebration with friends is going to feature prime rib. But here, I stayed in the avian family and went for fried chicken. It is actually brilliant! The recipe scales well, up or down, so you can make exactly the number of pieces you want for the meal, plus leftovers (or not). This particular recipe calls for boneless dark meat, so it cooks quickly, and it can even be made in advance and reheated for serving. It’s basically the most chill Thanksgiving entree option, which you might not expect from a recipe asking you to deep fry (and don’t worry, I know it’s a lot to heat up a pot of oil, so this won’t be the last recipe making use of the fryer).

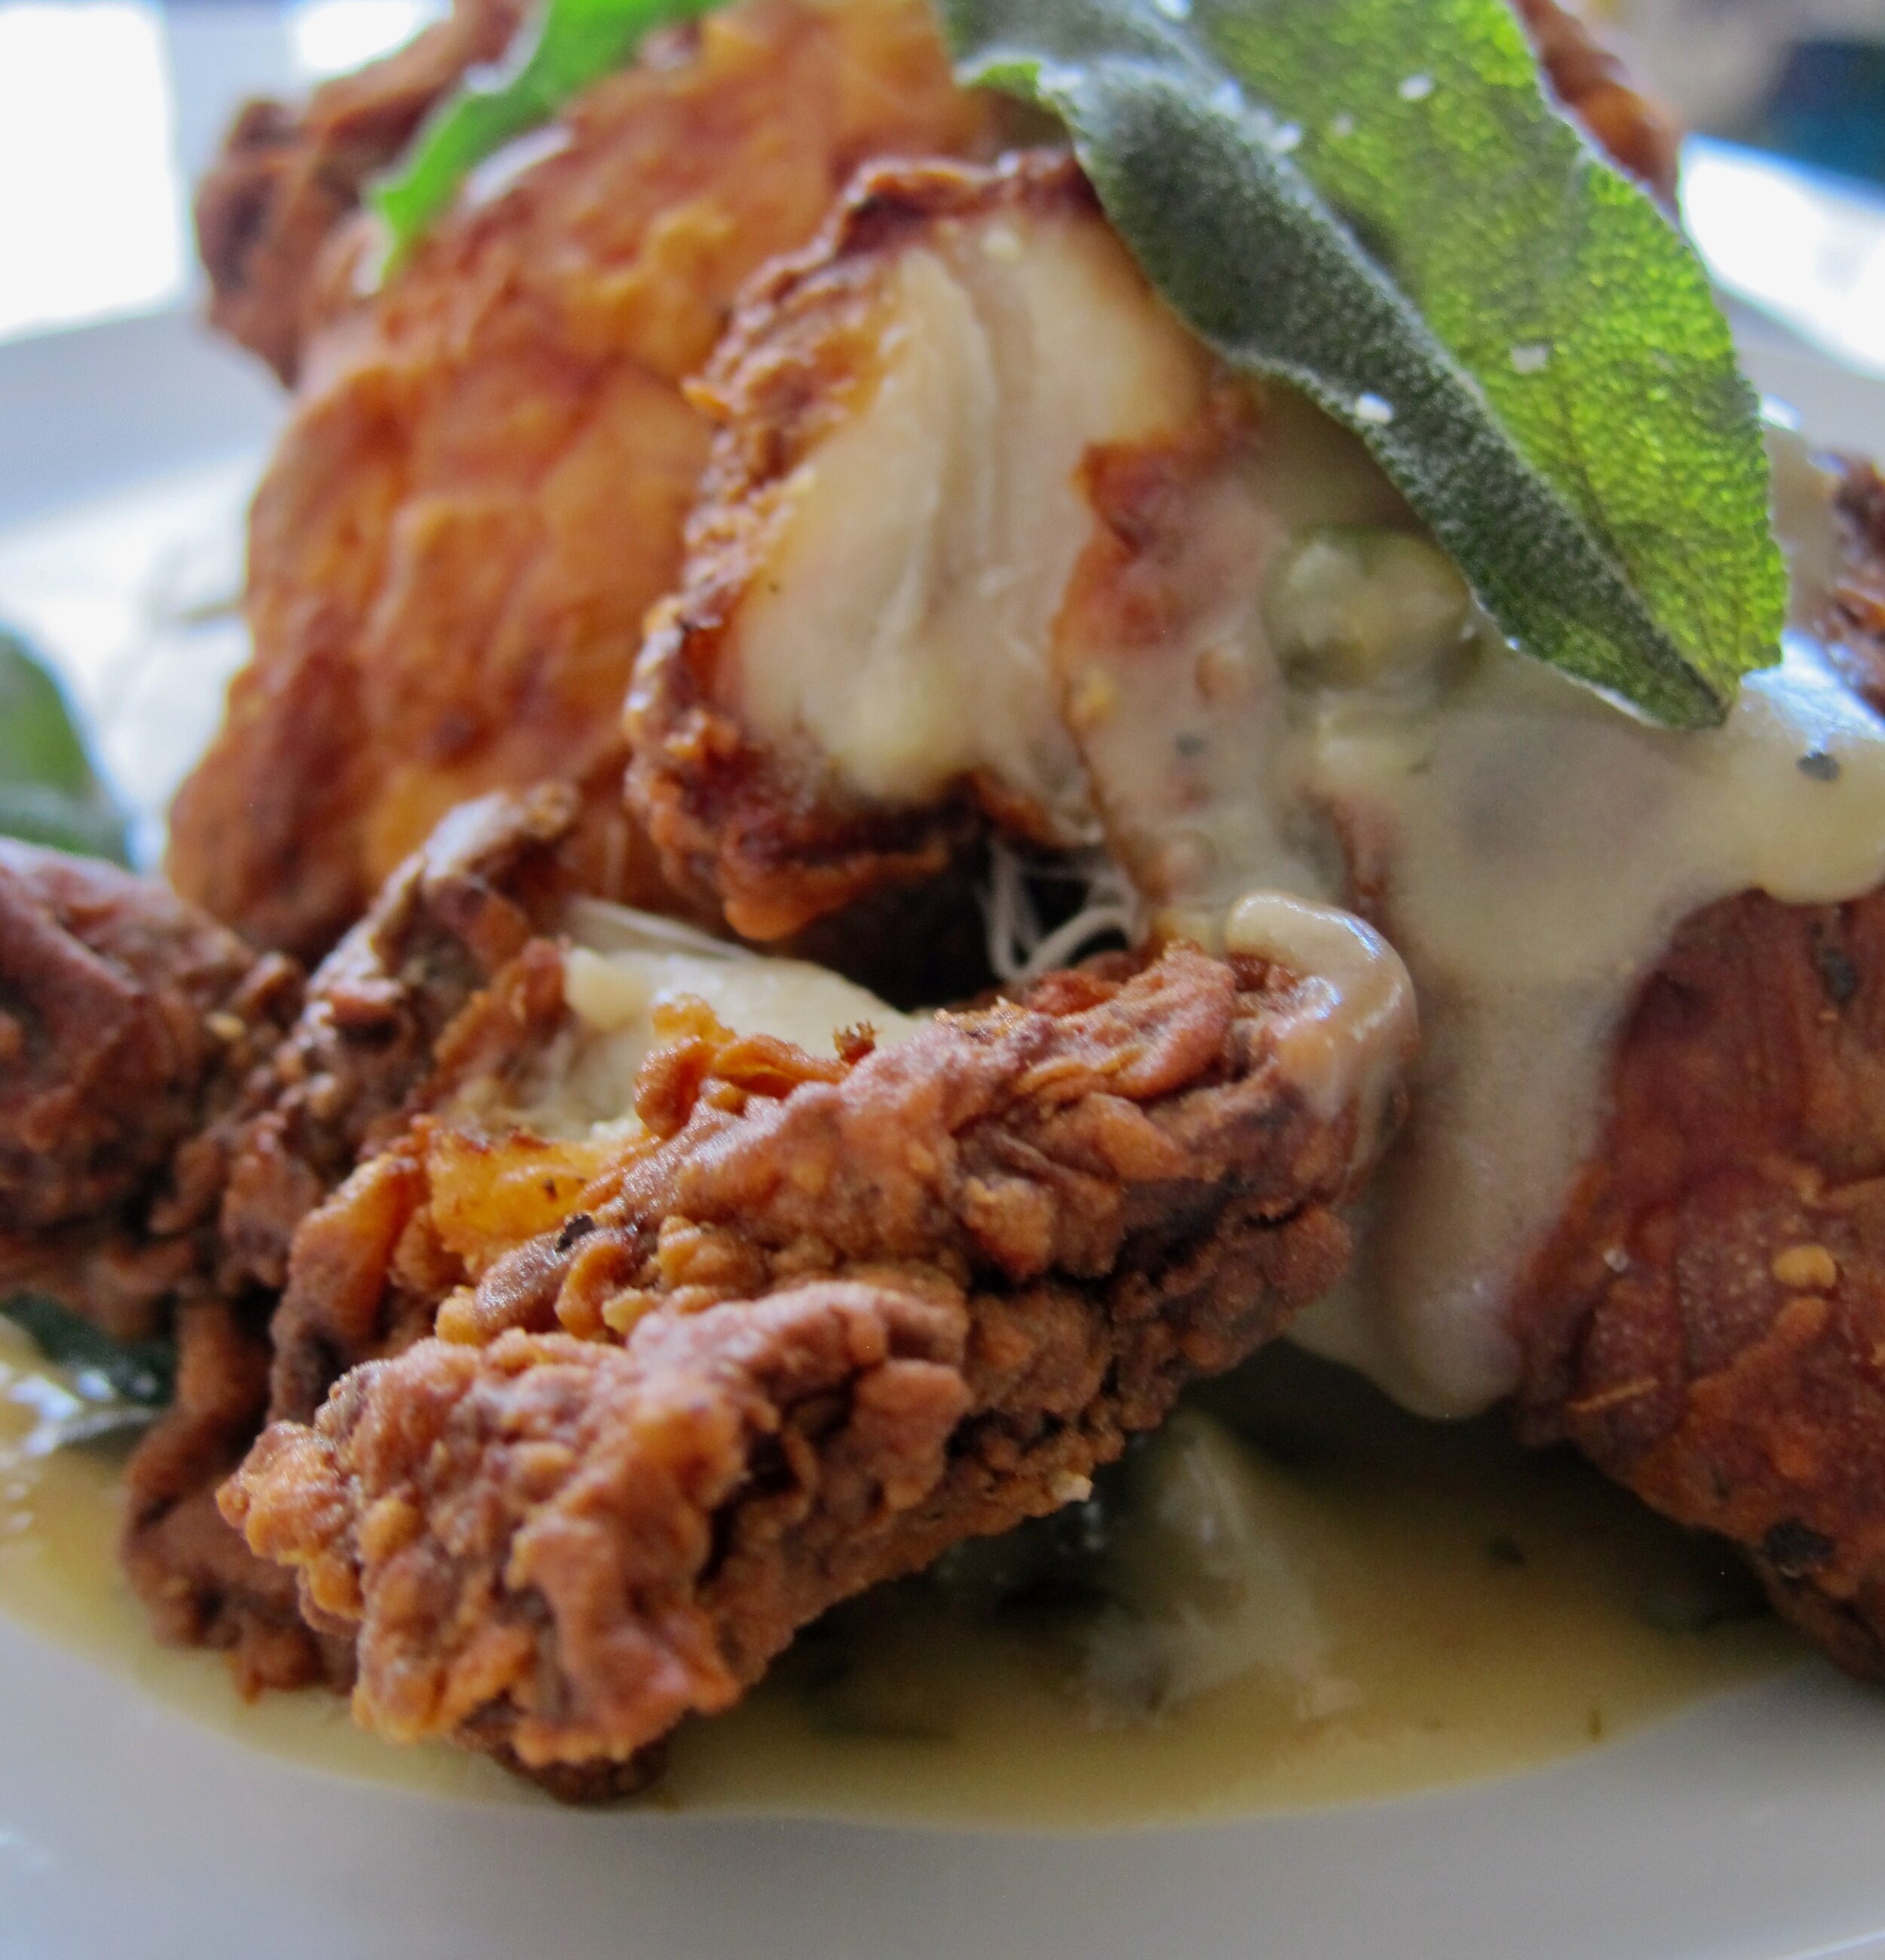
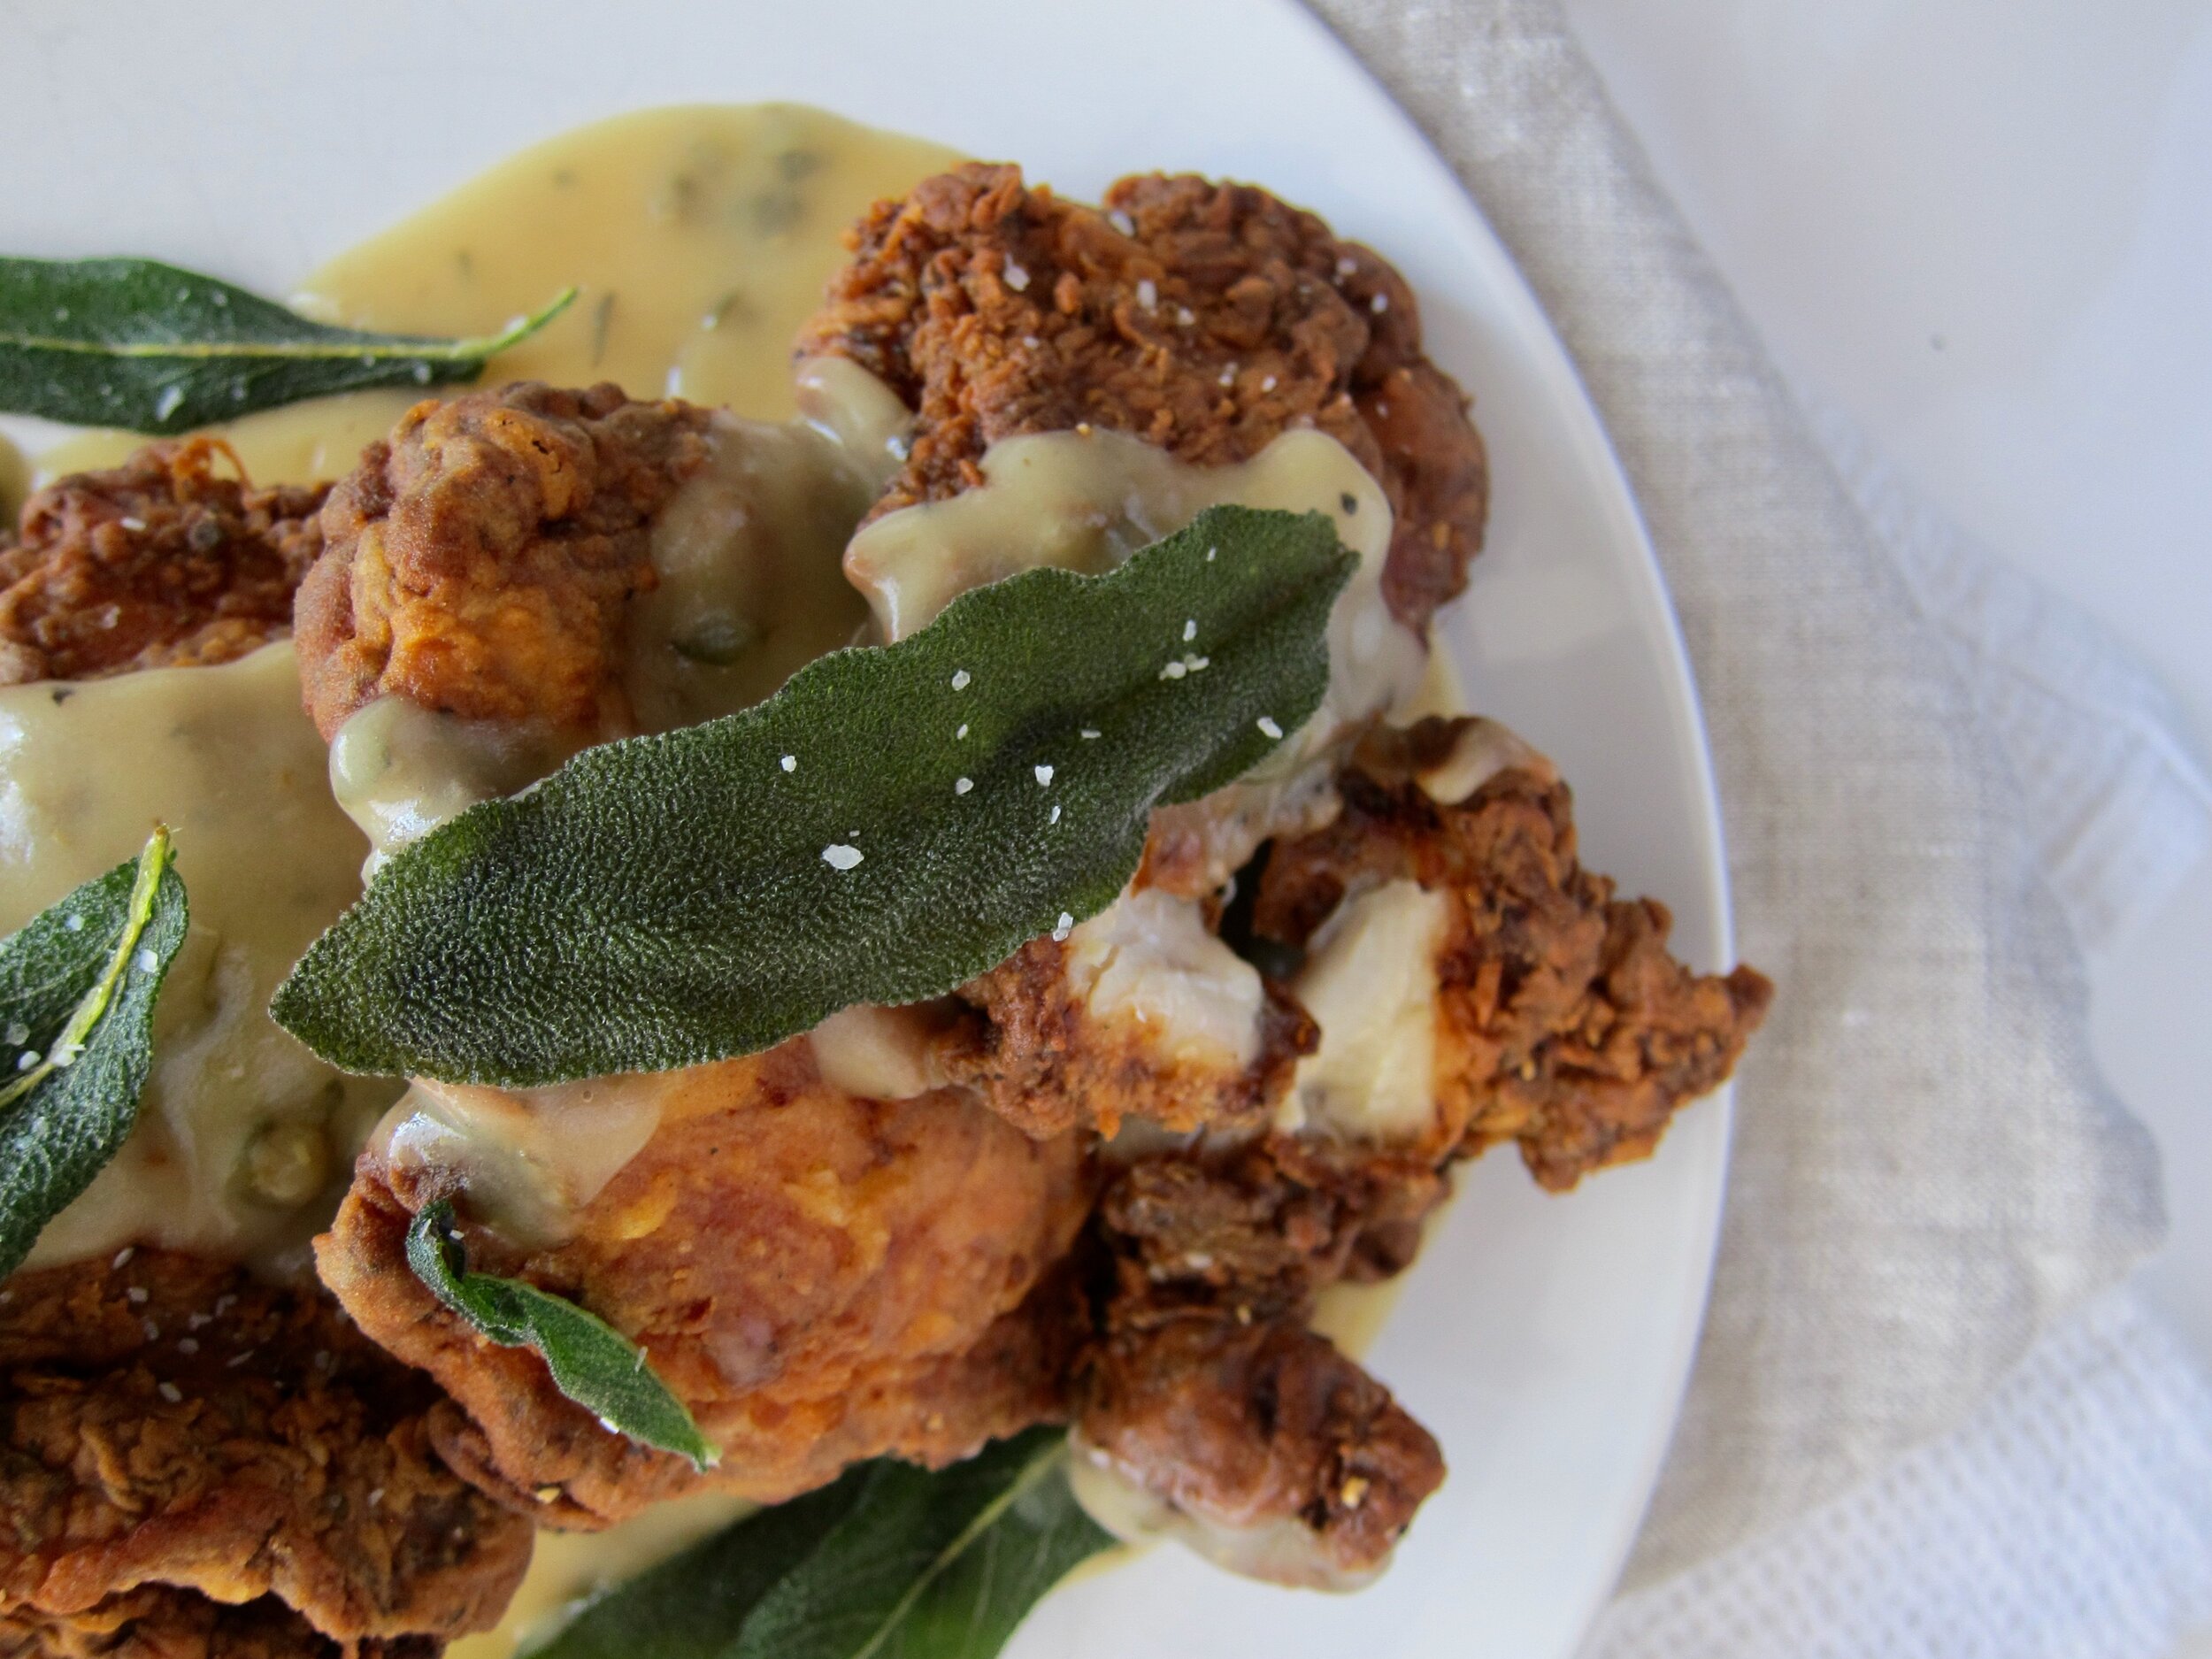
This is probably the easiest fried chicken I’ve ever made! I don’t think I’ll ever fry whole, bone-in pieces again after trying this, because it cooks much faster when boneless, and it is much, much easier to eat this way. The recipe also makes a genius swap of yogurt for buttermilk, which is just less messy to deal with, but also creates the crunchiest coating ever. You can tell I was enamored of the crunch from the photos! I mean, just look at that piece below. Swoon! And as a final, holiday worthy touch, go ahead and fry some of the sage to garnish your chicken with. It looks impressive, smells heavenly, and most importantly for a Thanksgiving table, cuts through the sea of beige.

About that beige, a.k.a. the gravy. I have gone for a rich, buttery version flavored with sage and plenty of tangy, salty capers to pair perfectly with the fried chicken. The recipe makes enough to smother the chicken if you want, but I think it’s better for spooning and/or dipping for two reasons: smothering your chicken in gravy is going to sog up those hard-earned crags and crunchy bits, and you want to save some for the side dishes! Of course there is going to be mashed potatoes, and they are going to need some of that gravy.

Thanksgiving Fried Chicken
Fried Chicken & Gravy
Crispy Fried Chicken.jpeg
Fried Sage on Fried Chicken.jpeg

Fried Chicken with Sage Caper Gravy

Makes 2-4 servings.

For the gravy:

  • 1/4 cup butter

  • 1/4 cup flour

  • 1 tbs chopped fresh sage

  • 2 tbs capers

  • 2 cups chicken stock

  • 1 tbs soy sauce

  • 1 tsp apple cider vinegar

  • salt and pepper, to taste

For the chicken (adapted from Cal Peternell):

  • 1 1/2 lbs boneless, skinless chicken thighs

  • 1 tsp salt plus more for the dredge mixture

  • 2 tbs plain yogurt

  • 1 cup flour

  • 1/4 tsp rubbed sage

  • oil, for frying

  • flaky salt, for finishing (optional)

  • sage leaves, for garnish (optional)

  1. Make the gravy: Melt the butter in a pot over medium heat, and add the flour when the butter is foamy. Stir, cooking the flour for 1-2 minutes, then, when the flour starts to color a bit, add the sage and capers, and cook another 1-2 minutes.

  2. Slowly whisk in the stock, a little at a time, then bring mixture to a simmer. Add the soy sauce and cook until thickened, about 3-5 minutes. Remove from heat, add the vinegar and fresh ground pepper to taste, then taste and adjust seasoning if needed. At this point, you can keep the gravy warm on the stove, or make in advance to this point, and reheat when ready to make the chicken. I would reserve a bit of chicken broth to use to thin the gravy when reheating, if you need to.

  3. Make the chicken: Heat a heavy pot with a good 2 inches of oil to 350 degrees. While oil is heating, season the chicken with the salt and a few grinds of pepper, then let sit for 15 minutes to come to room temperature. Coat chicken with the yogurt and set aside. In a shallow dish, combine the flour, sage, some black pepper and a good pinch of salt.

  4. When the oil is ready, dredge the chicken in the flour mixture, and gently lower into the hot oil. Fry chicken in batches to avoid crowding the pot. Cook for 12 minutes, flipping a few times to ensure even color, then transfer to a baking sheet set with a wire rack. Season immediately with a little flaky sea salt, if desired. Keep chicken warm in a low oven while you fry the remaining pieces. Serve hot, with the gravy. Just before serving, fry a few pieces of well-dried sage for about 30 seconds, drain, season with a little salt, and garnish (optional).

Notes:

  • Once you use it to fry chicken, oil cannot be reused, so if you are frying multiple things when making fried chicken, make sure you fry the chicken last.

In Recipes Tags Main Dish
1 Comment

Olive Oil Fried Donuts with Preserved Lemon Cream

October 30, 2020 Allie
Olive Oil Fried Donuts with Preserved Lemon Cream

Sometimes I think of foods to make and whip them up immediately, and sometimes I sit on an idea for years. These donuts fall into the latter category. I’ve been wanting to try frying donuts in olive oil since I learned you can fry things in olive oil, and I’ve been obsessed with adding preserved lemon to desserts for a while now. But the last time I tried to make filled donuts it did not go well. I ended up with greasy, flat and heavy things leaking apple butter. I was somewhat scarred from that experience.

Time is good for forgetting kitchen disasters, so I was finally ready to try again this year. I remembered this genius recipe too for making a small amount of donuts, and so I knew I could make a manageable amount, not enough to stock a whole store. I will happily eat four donuts, but 16 is too much even for me, and it’s not as easy to give away food these days. And then, when my roommate brought home the most beautiful, sunshine-yellow Meyer lemons from her parents’ house, I knew it was time to make a new batch of preserved lemons. Which meant that six weeks later it was time to make donuts!

Happily, my donuts this time around came out perfectly. Really, just exactly the plush texture I love in a yeasted donut, and the filling was just the right kind of salty sweet I was hoping for. I’m the only one who can vouch for these, since all four were gone in a matter of days, before I could share. I can’t say I’m sorry about that, but it does mean you’ll just have to take my word for it and try these out.

preserved lemon cream donut
preserved lemon donut.jpeg
Preserved Lemon Donuts.jpeg
tossing donuts in sugar

Preserved Lemon Cream-Filled Donuts

Makes 8 donuts

This recipe has some steps, but you can make the pastry cream a day or so in advance and keep chilled until needed. These donuts are best eaten fresh, the day they are made. If you don’t plan to eat them right away, I would wait to fill them. Once they are filled, they need to be refrigerated, and the fridge will not do anything good for the texture.

For the Preserved Lemon Pastry Cream:

  • 1 quarter to 1 half of a preserved lemon

  • 1 tbs preserved lemon juice (liquid from the jar)

  • 1 cup whole milk

  • 1/4 cup sugar

  • zest of 1/2 Meyer lemon (organic and unsprayed if possible)

  • 1 inch peel of lemon (from the same lemon as the zest)

  • 2 egg yolks

  • 2 tbs corn starch

  • 1 tbs unsalted butter, cut into pieces

  • 1/2 cup heavy cream

For the donuts (adapted from Joy the Baker)

  • 2 1/4 tsp active dry yeast

  • 3 tbs warm water

  • 3 cups all purpose flour

  • 3/4 cup whole milk, warmed to just above room temp

  • 3 tbs unsalted butter, room temp

  • 3 egg yolks

  • 2 tbs sugar

  • 1 1/2 tsp salt

  • 2 1/4 cup granulated sugar, for rolling

  • a few fresh thyme sprigs

  • zest of 1/2 Meyer lemon (organic and unsprayed if possible)

  • olive oil, for frying

  1. Make the pastry cream: Blend the preserved lemon and the juice until smooth, and set aside. Rub the lemon zest into the sugar, and then warm the milk with 1/2 of the sugar and the peel, until simmering. Set aside to steep for 15 minutes.

  2. Bring the milk mixture back to a simmer over medium heat. In a heat-proof bowl, whisk the egg with the corn starch and remaining sugar, then whisk while slowly adding the milk, a bit at a time, until incorporated. Pour the mixture back into the pot over medium high heat, and cook, whisking constantly, until the mixture thickens and begins to bubble. After you see the first bubble, continue whisking for 90 seconds, then remove from heat and pour the mixture through a fine mesh strainer into a bowl. Whisk in the butter and then the lemon puree. Cover with plastic wrap pressed against the surface of the pastry cream, then chill at least 2 hours. Stir vigorously before using.

  3. While pastry cream is chilling, make the donuts: Stir together the yeast and the warm water until the yeast is dissolved, and let sit 5 minutes, until foamy. Add the yeast mixture to the bowl of a stand mixer with the flour, milk, butter, egg yolks, sugar and salt, and mix on low speed with the dough hook until everything combines, then increase the speed to medium high and beat for 3 minutes more.

  4. Scrape down the sides of the the bowl, then sprinkle the dough with a bit of flour, cover with plastic wrap, and let rise for one hour, until doubled.

  5. Turn the dough out onto a floured surface, and roll out to a 1/2 inch thick round. Cut into rounds with a 2 1/2-3 inch cutter. Place rounds on parchment lined baking sheet and let rise, covered, for another 30 minutes. Let the scraps rise too, they will be excellent testers for frying (and snacking).

  6. In a bowl, rub together the thyme, lemon zest, and sugar and mix with a pinch of salt. Set aside.

  7. Heat enough olive oil in a sturdy pot to reach 3 inches up the sides, to 350 degrees. You can get away with a smaller pot and thus less oil, but make sure the sides are high enough you won’t be in danger of oil bubbling over, and only fry enough donuts at a time so you don’t crowd the pan. I fried these one at a time, and since they only take a few minutes each, that’s not a ton of frying time, and easier to manage the sugar dusting.

  8. When your oil has reached temperature, get your assembly line ready. Pour the thyme lemon sugar onto a rimmed baking sheet, or a cake pan, or any vessel that will work for tossing a hot donut in. Use some of the dough scraps to test out your oil. Fry each round for about 1 minute per side, then remove and immediately transfer to the sugar mixture. Toss to coat on all sides, then set on a wire rack to cool completely.

  9. Once you have fried and cooled all the donuts, whip the heavy cream to soft peaks and fold in the pastry cream. Fill a piping bag (or zip top bag with the corner snipped off) with the filling mixture. Using kitchen scissors, snip a hold in the side of each donut round, and use the handle of a teaspoon to widen the hole enough to fill. Insert the tip of the pastry bag in the hole and fill with desired amount of filling. The donut should feel heavier once filled. Repeat with remaining donuts and enjoy ASAP!

In Recipes Tags Dessert
Comment

Cast Iron Pepperoni Pizza with Spicy Honey & Basil

October 23, 2020 Allie
Cast Iron Pizza

Hello, with pizza! Pizza I meant to post last week, but I never got around to it. I wish I could say I had something really important going on, but I can’t. The truth is that I finally got my hands on a Nintendo Switch and Breath of the Wild has been my life for the last two weeks.

It’s not like I wasn’t warned! I have friends who love the game, and last year both my friend Ginny and my sister were obsessed, so I knew once I started I’d probably be hooked too. I did not know that I’d be staying up until two am for the first time in months or spending an hour trying to move one block of ice into the perfect position to move a ball into a hole or trying to figure out how to cook just the right foods to level up. I really wish I had had this game when I was unemployed! It is probably for the best I did not, as it pushes all my puzzle-loving, addictive buttons and I probably would never have left my couch.

I would normally probably be feeling some guilt about spending so much time on a video game, especially since we’ve been having warm weather and I should be exercising, etc. But you know what? It’s bringing me joy and we all need more of that this year, so I will allow it for myself.

Another source of joy this year has been this pizza. It’s true! King Arthur Flour has a “recipe of the year” every year, which I usually dismiss as a marketing gimmick, which of course it is, but this year, their choice was a cheesy pizza cooked in a cast iron pan, with a pillowy dough I thought we’d been trained against embracing. Thin crust this is not! But I adore anything that reminds me of the personal pan pizzas we used to order at Pizza Hut with my grandparents, and this sounded like the homemade version of that, just not so personally pan-sized (assuming I practice restraint).

I made this at the very start of work from home, way back in March, and I recently revisited it because I wanted a little comfort food and was craving a pizza. And I don’t seem to be the only one! I have seen versions of this pizza all over food media and twitter, and I think this recipe is just hitting the right note of carby, cheesy comfort for all of us this year, especially now as we head into what is sure to be an interesting Winter.

So here is my version, complete with pepperoni as a nod to my childhood ordering at the Hut, and with a drizzle of spicy honey for that sweet/spicy/salty combo, and a scattering of torn basil because I’m an adult now so I need a little green on everything I eat.

I highly recommend making this! Enjoy the tactile process of stretching the dough, enjoy the cheese, and enjoy the golden, crispy crust!

Cast Iron pizza with pepperoni, spicy honey and basil
KAF cheesy pizza
slice of cast iron pizza

Cheesy Pepperoni Pizza with Spicy Honey & Basil

Adapted from King Arthur Flour. This pizza is actually a great one for our current work from home weeknights, as much of the time is hands off as you wait for the dough to rise, and the baking time is only about 20 minutes. Just be sure to plan ahead as you will need to make the dough at least 15 hours before you plan to bake it.

  • 2 cups (240g) all purpose flour

  • 3/4 teaspoon kosher salt

  • 1/2 teaspoon active dry yeast

  • 3/4 cup (170g) water, room temp or slightly warmed

  • 1 tablespoon (13g) olive oil, plus more for the pan

  • 1 1/4 cup shredded mozzarella

  • 1/3 cup pizza sauce (plus more if needed), store bought, no shame!

  • 1/4 cup pepperoni

  • spicy honey (or honey + some cayenne pepper or hot sauce)

  • basil, for garnish

  • pecorino romano or parmesan, for garnish

  1. Make the dough: Combine flour, salt, yeast, water and 1 tbs of olive oil in the bowl of a stand mixer (or regular bowl if you are mixing by hand). Stir it all together for about a minute into a shaggy dough with no dry spots. Gather the mass into a ball and cover the bowl with plastic wrap or a clean kitchen towel.

  2. Let dough rest for 5 minutes, then uncover the bowl and use a wet hand to reach underneath the dough, and pull the bottom of the dough, stretching it up and over the top of the dough. Repeat this process three more times, once on each side of the dough. Basically, instead of kneading the dough, you are stretching it into shape.

  3. Re-cover the bowl, and after 5 minutes repeat the stretching process again. Wait 5 minutes and do it again, then another 5 minutes, and do a fourth and final stretch. Cover the bowl and let the dough rest for 40 minutes. Then chill the dough for at least 12 hours, or up to 72 hours. This will help develop flavor over the long rise.

  4. About 3 hours before you want to serve your pizza, prepare your cast iron pan. Pour a couple tablespoons of olive oil into a well-seasoned, 10-inch cast iron skillet. Spread the oil over and around the pan, and up the sides, anywhere the dough is going to touch as it rises.  Transfer the dough to the pan and flip it in the pan to coat with the oil. Press the dough gently to the edges of the pan, using the tips of your fingers to dimple the dough as you work it. At this point, the dough will shrink back from the sides, but cover with plastic wrap, let rest 15 minutes, and repeat. Then rest another 15 minutes and repeat again.

  5. Cover the dough with plastic wrap and let it rise for 2 hours at room temperature. About 30 minutes before you plan to start baking, place one oven rack at the top of the oven about below the heating element or broiler, and one at the bottom of the oven. Now is a good time to also preheat the oven to 450°, if your oven takes time to climb to that temperature, like mine.

  6. When it’s time to bake, sprinkle about 1 cup of the cheese over the dough, crust to crust, to the edges of the pan. Drop spoonfuls of the pizza sauce on top of the cheese, then cover with the remaining cheese. Place the pepperoni as desired, then bake on the bottom rack for 20 minutes, until the cheese is bubbling away and crust is golden brown. You will need to use a spatula to lift up the crust and check.

  7. If the bottom is golden but you want to brown the cheese a bit more, move the pizza to the top rack and bake another few minutes; if the top is done but the bottom isn’t yet golden, keep the pizza where it is for another few minutes. I usually find that my pizza is where I want it after 20 minutes, but use the extra few minutes to get the pepperoni extra crispy, the way I like it.

  8. Once the pizza is done to your liking, remove from the oven and let sit for a few minutes to cool to where you can touch it without hurting yourself. Run a knife around the edges to make sure no cheese is sticking, then drizzle with the honey, top with torn basil, and grate a good amount of parmesan or pecorino over the top. Serve immediately in the pan, using a good pair of kitchen scissors to cut slices. Or, if not serving right away, remove from the pan so the crust doesn’t steam. We want a plush, yet crisp, bottom, not a soggy bottom!

In Recipes Tags Main Dish
Comment
← Newer Posts Older Posts →

For those who plan their next meal while eating the last.


INSTAGRAM

🎶When pizza’s on a bagel*, you can have pizza anytime**!🎶

*donut
** after you fry some donuts
FINALLY perfected these Burnt Honey Butter Biscuits & what good timing! It’s carb season & we are all hibernating! 🐻
Final thoughts on Small Thanksgiving: take your sweet potato + marshmallow combo firmly into dessert or even breakfast, and consider a cozy mashed potato soup with stuffing croutons to use up those leftovers. Stay safe & Happy Thanksgiving! 😷🦃
Part 2 of Small Thanksgiving: all the stuff to stuff yourself with! An Italian sausage pasta-inspired stuffing and a vegetarian, spiced wild rice stuffed squash. Everything serves 4-6, gather safely this year! 😷🦃 #thanksgiving #smallthanksgiving #v
Now that we (and the world?) can let out that collective sigh of relief, I can  finally think about my favorite holiday! Everyone is probably (hopefully 😷)looking at smaller gatherings this year, so I’m sending some Small Thanksgiving ideas ou
So happy Disney keeps justifying my dumb baking purchases! This matcha shortbread is delicious, but make a good sandwich cookie it does not. I hid all the broken pieces 🙈
Subscribe to Tea and Fog!

RECENT RECIPES

Featured
polenta with rosemary and goat cheese.jpeg
Salmon Wellington and Warm Rice Salad.jpeg
Pizza Donut Hero.jpeg
Burnt Honey Butter Biscuits.jpeg
Mashed Potato Soup with Stuffing croutons.jpeg
sweet potato donuts with marshmallow frosting.jpeg