• Home
    • Recipes
    • The Roast Chicken Project
    • Allie Dreams of Cake
    • Sunday Suppers
  • Travel
  • About
Menu

Tea and Fog

Street Address
City, State, Zip
Phone Number

Your Custom Text Here

Tea and Fog

  • Home
  • Recipes
    • Recipes
    • The Roast Chicken Project
    • Allie Dreams of Cake
    • Sunday Suppers
  • Travel
  • About

Plum & Ginger Caramel Cake

August 28, 2020 Allie
plum and ginger caramel layer cake

Remember how I was done with baking?

Hahahahaha. Have I met me?

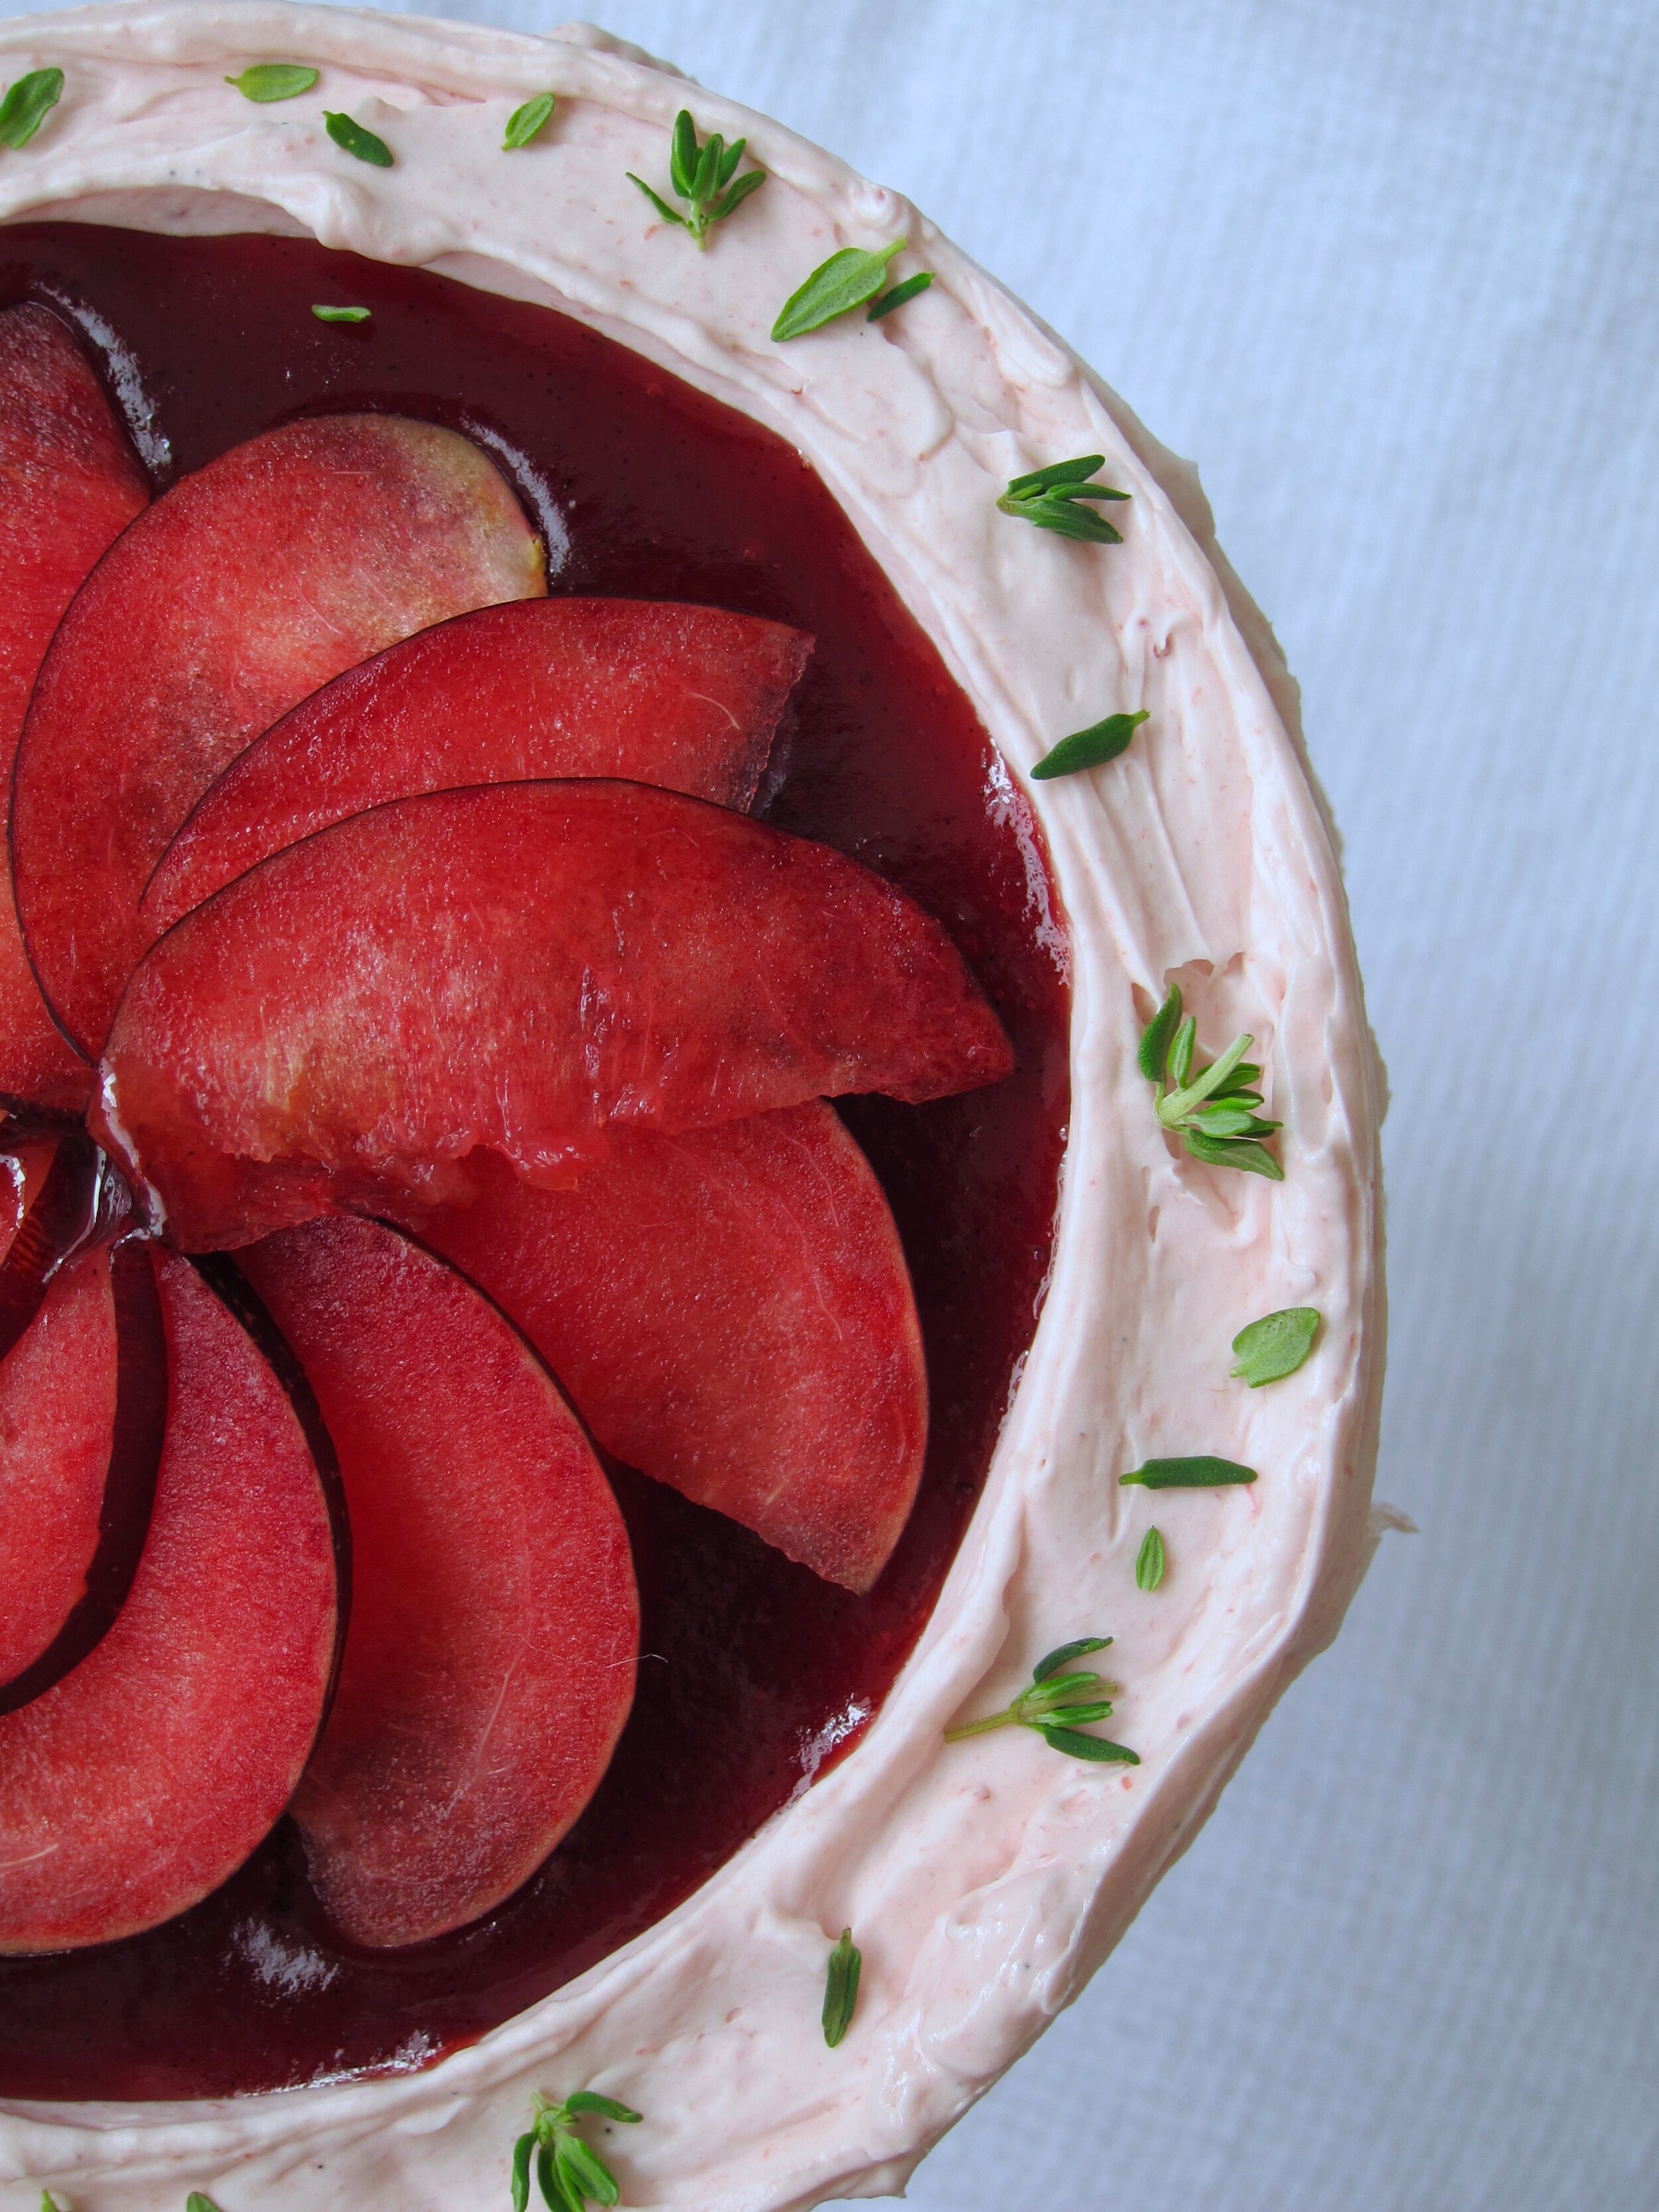
Ironically, it was that very cake recipe that lured me back into the kitchen! It’s just so, so good. So I got in the mood to make a layer cake, and of course, it’s stone fruit season so plums got involved.

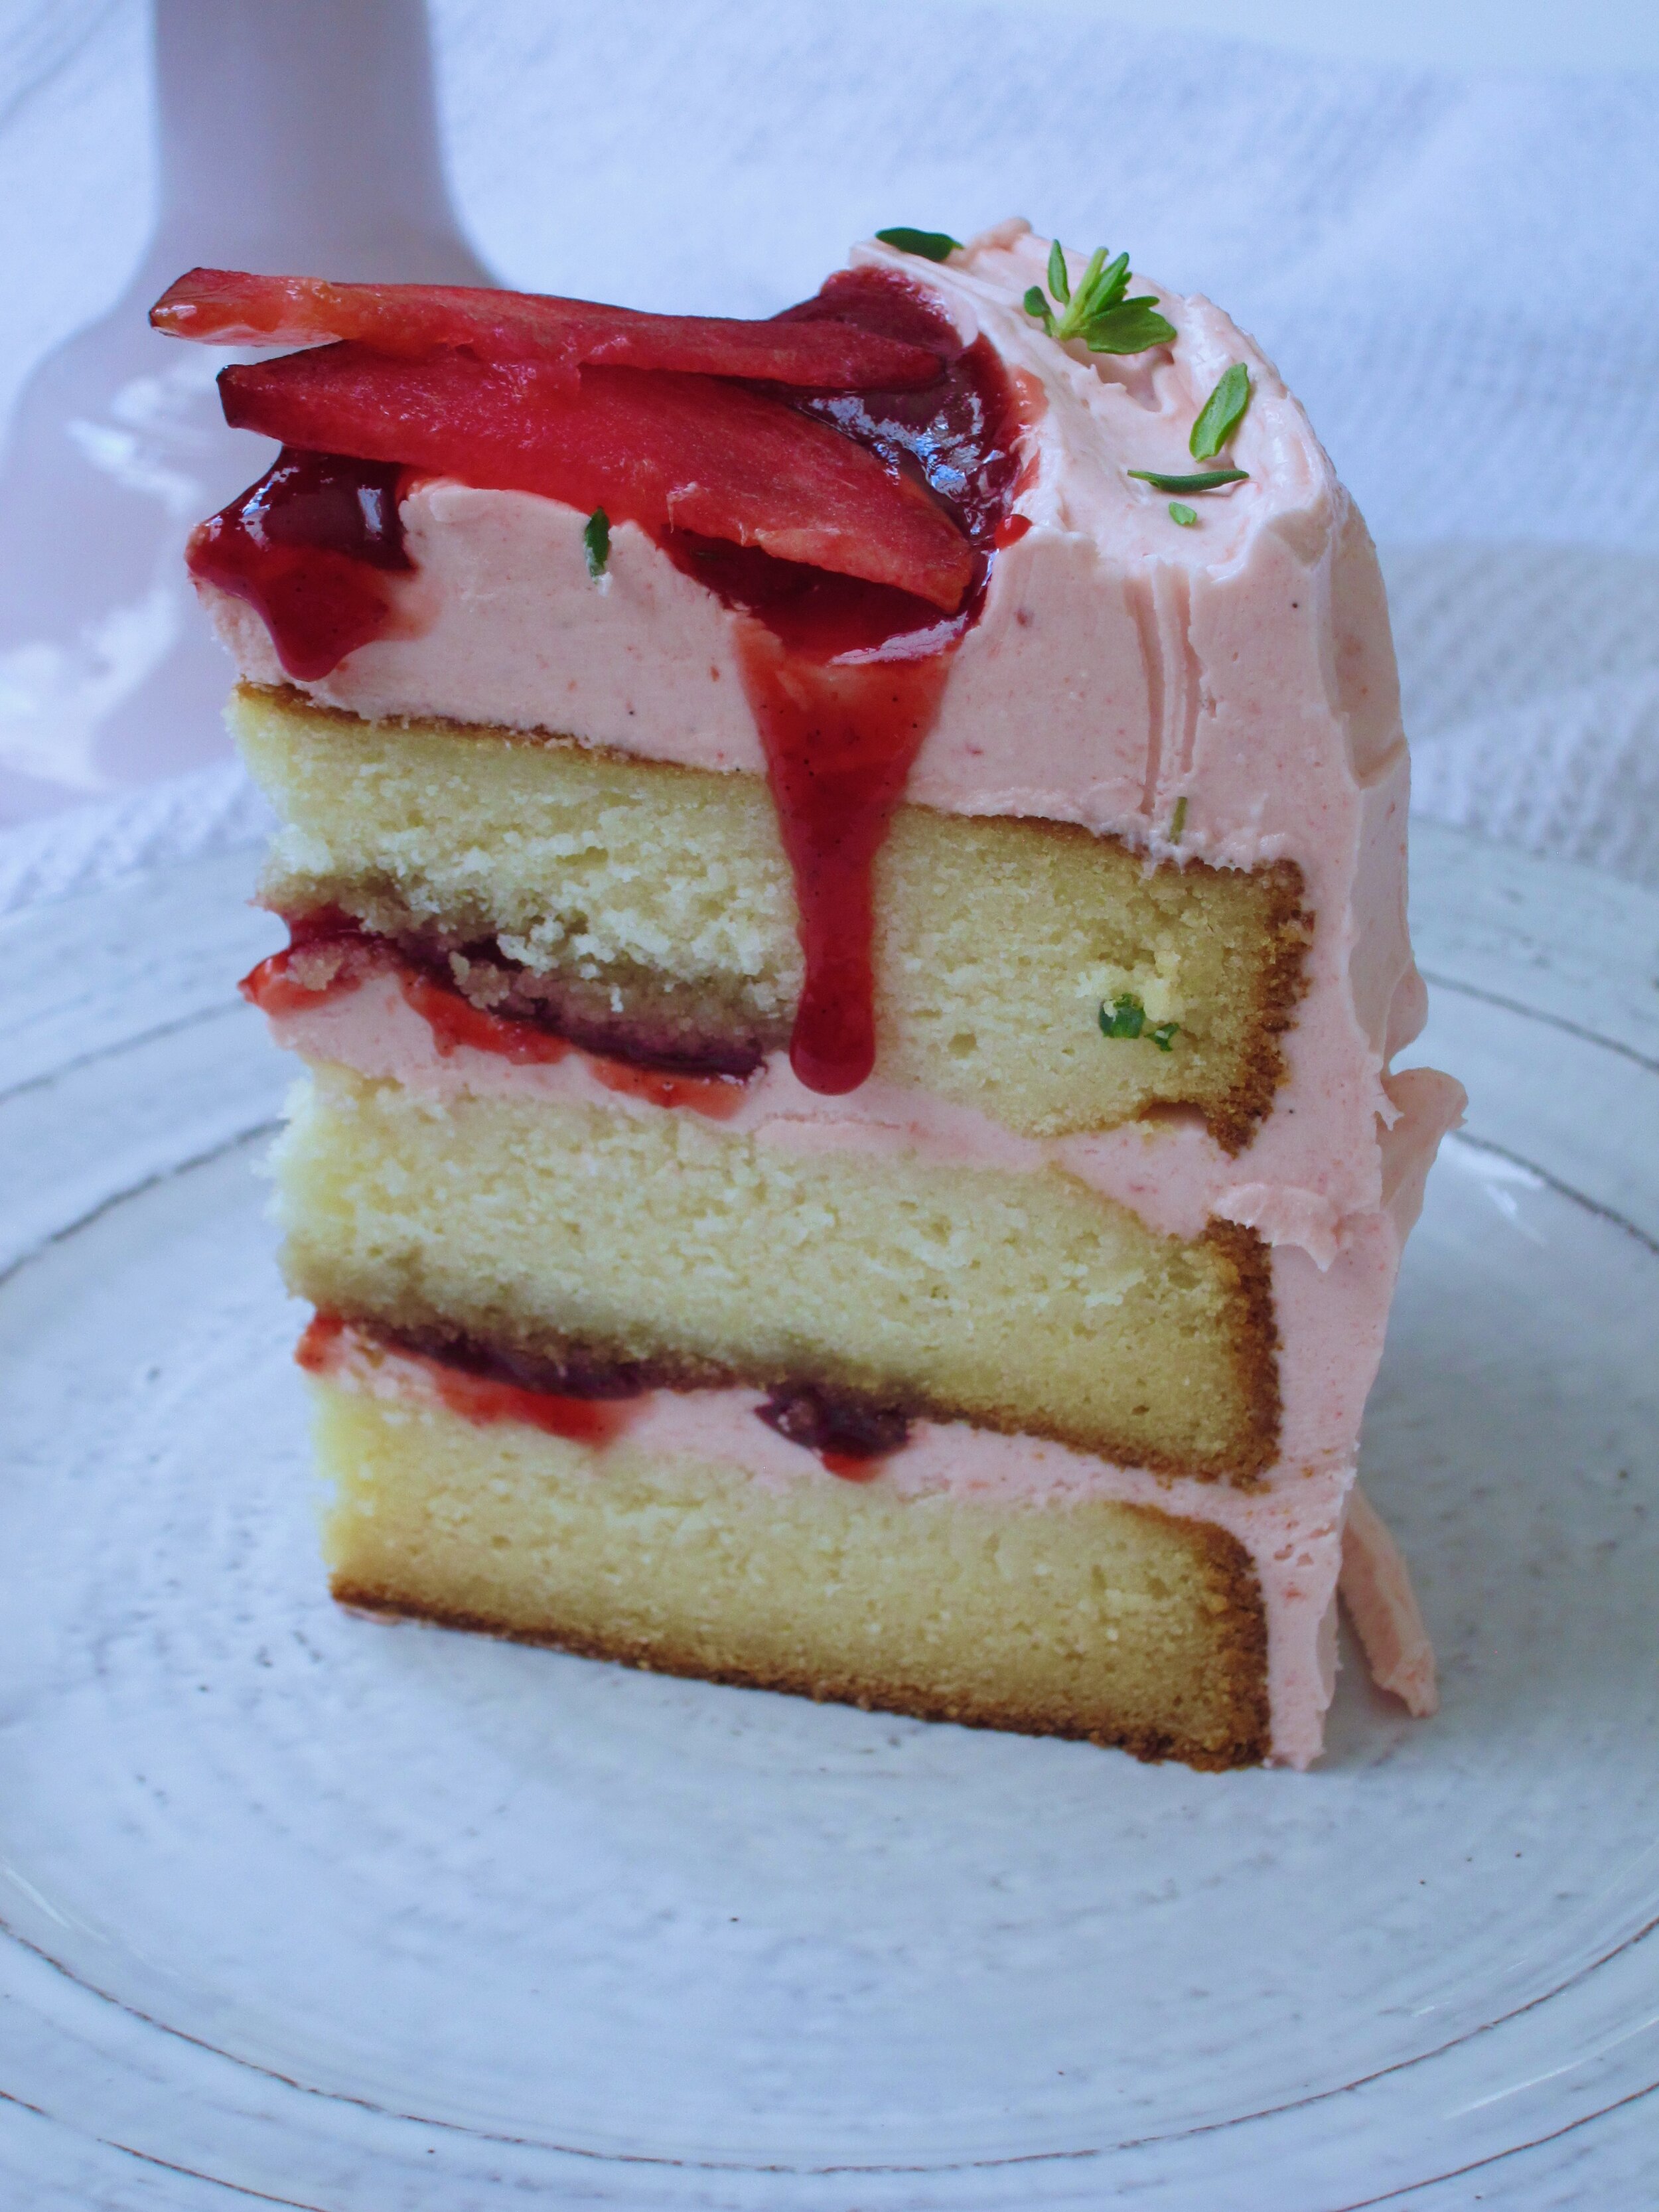
Actually, this cake is full of familiar recipes! There’s the white mountain cake base, along with Stella’s Marshmallow Buttercream to go with, which I’ve never written about here but have shared on Instagram (one of my crazier moments!). The great thing about that frosting is that, while it takes a little more patience and time than other frostings, it doesn’t have the eggy taste that swiss meringue buttercream can sometimes have, and it can hold a good amount of liquid flavorings, meaning it’s infinitely adaptable. And the liquid I added was a plum caramel, from the same base recipe I used on a tart way back in 2017.

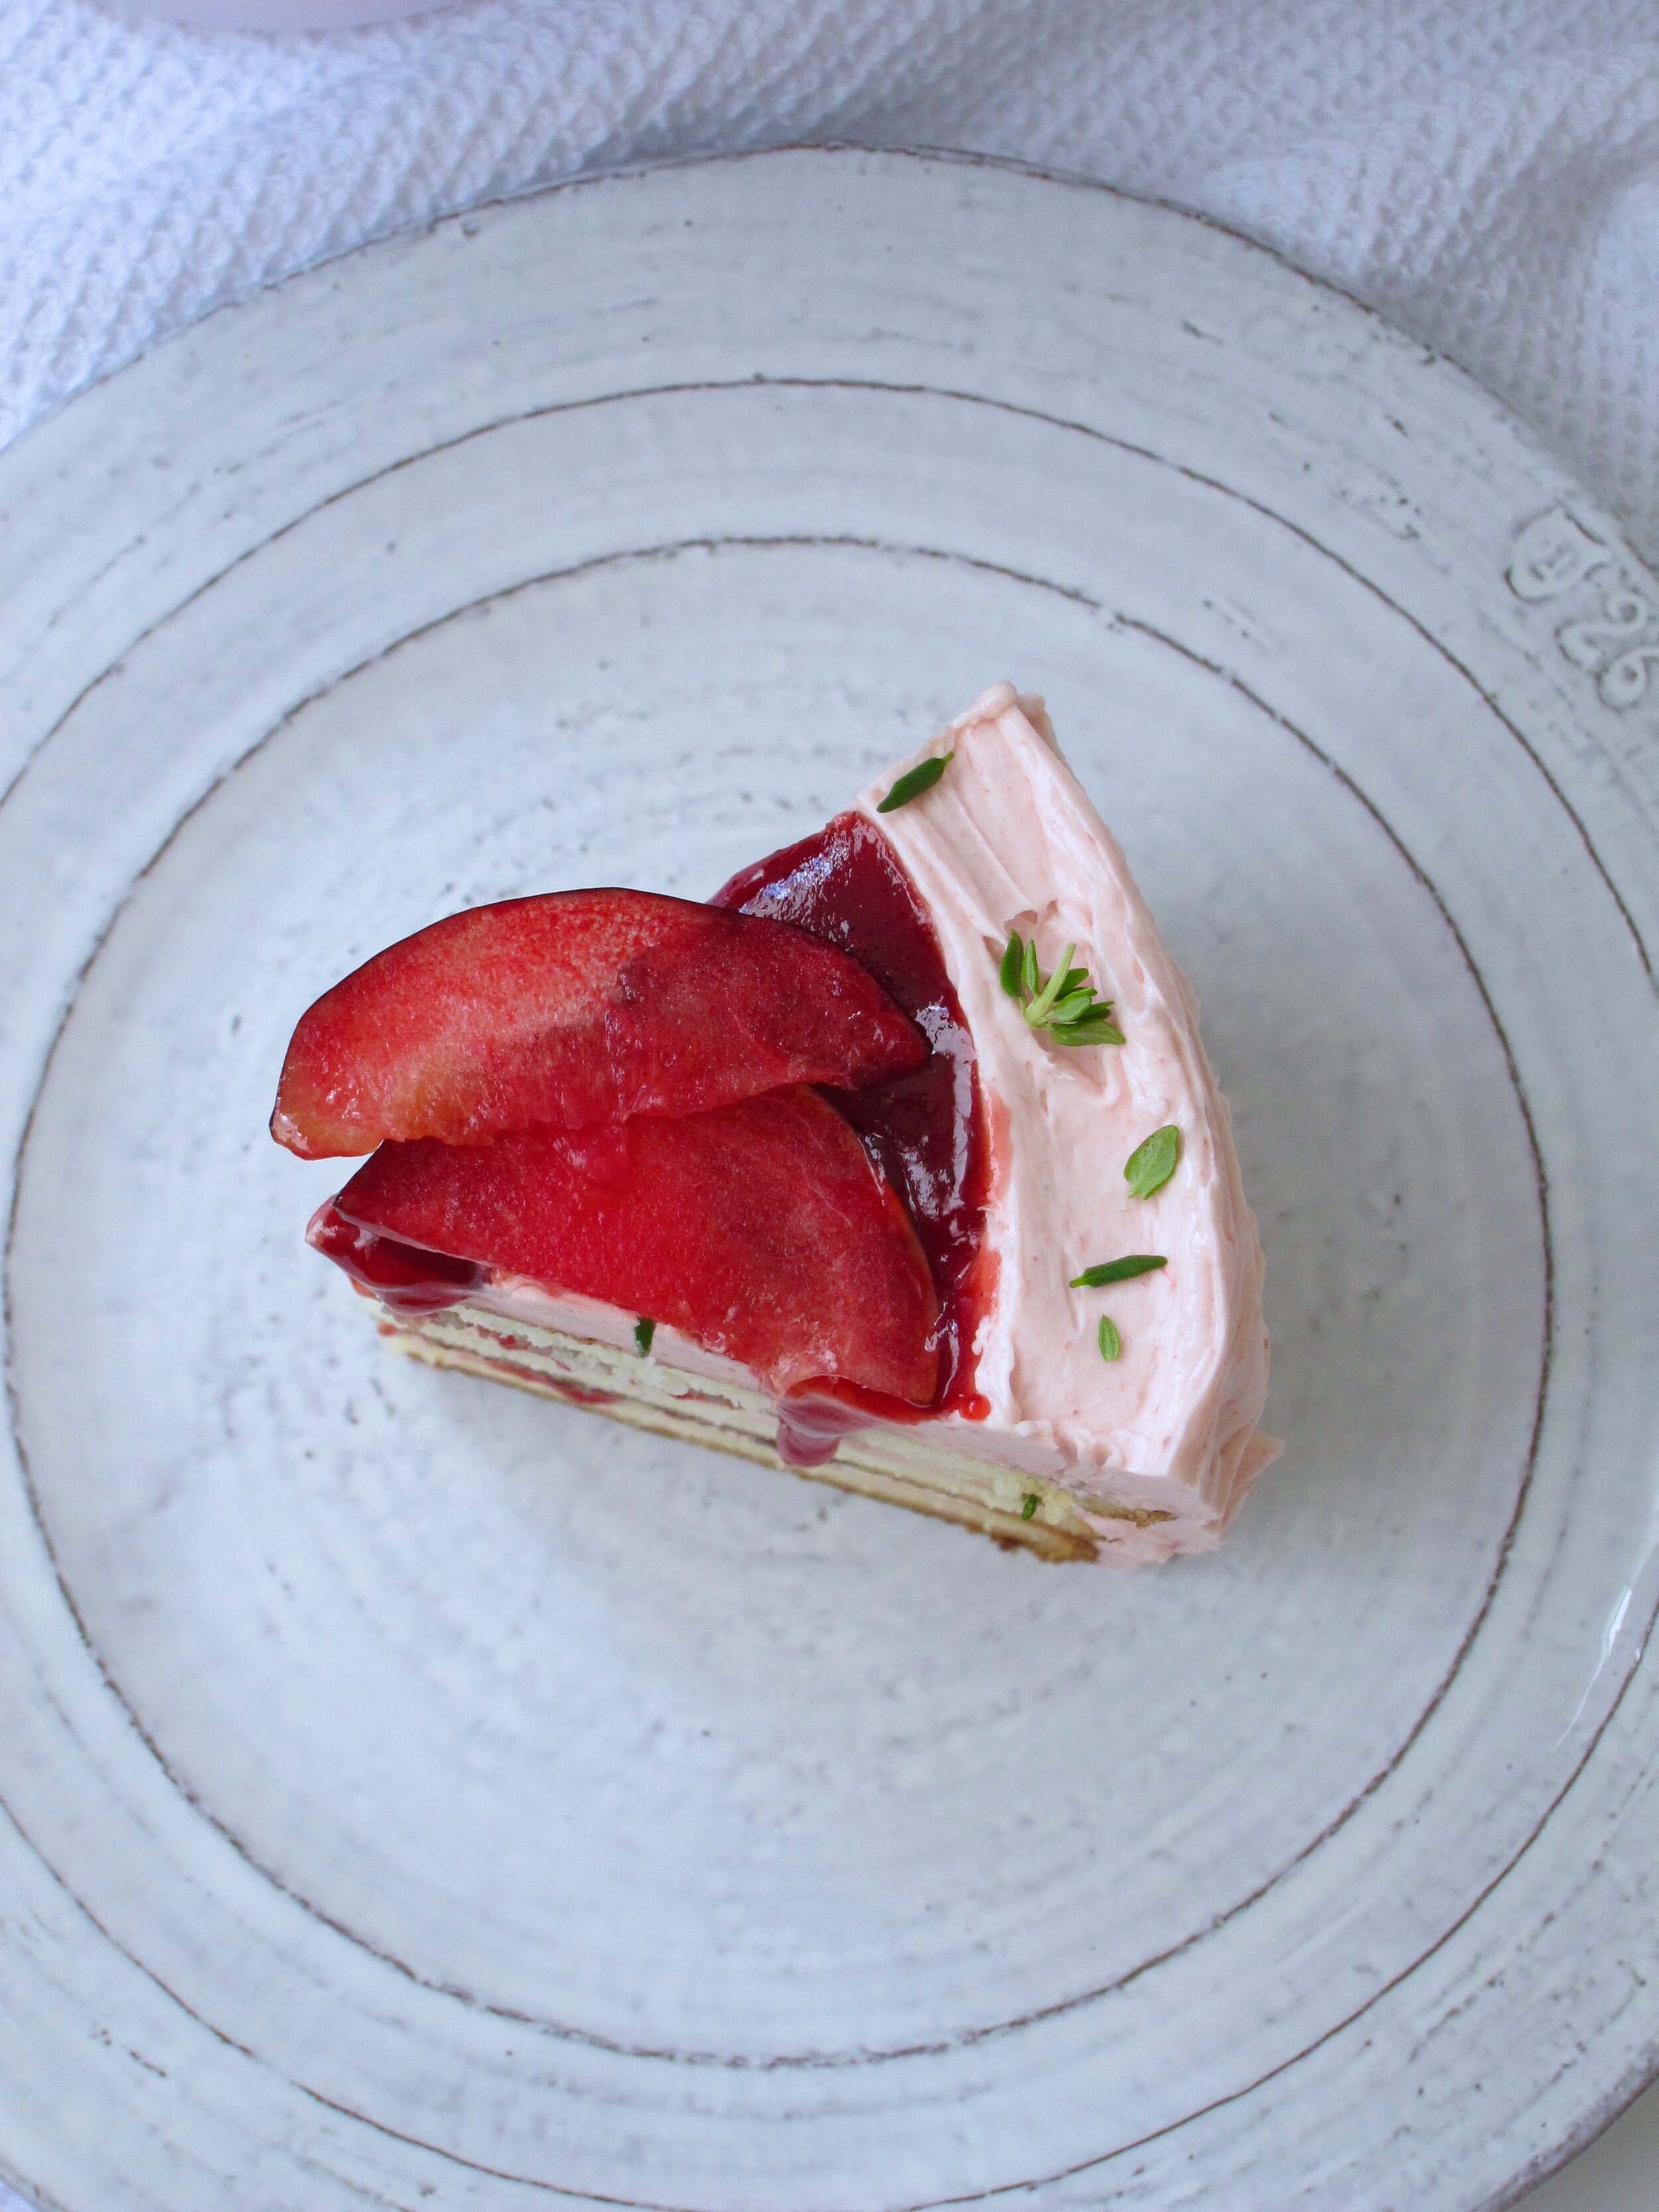
The plum caramel is really special. Adding in the plum puree instead of cream doesn’t make the end result taste especially like caramel, but gives the sweetened fruit a depth of flavor that just adds a little something more. The ginger gives everything just a little more zing. It’s perfect paired with the sweeter frosting here, and the plain vanilla of the cake lets the plums shine through as the star. Plus, how pretty is that pink?

This cake was a good reminder of how to find calmness in the kitchen, but also to just remain calm in the kitchen! It is a project, for sure, with all the various components, but I was not thinking of the news or anything, which was a nice break. I did, however, unfortunately decide to make a cake, and more specifically, buttercream in a heatwave, so my initial finished frosting was soup, basically. But I did not panic! Butter, as always, will firm up when it’s cold. My kitchen was sweltering from having the oven on, but I still have a fridge, so my buttercream got some time in the AC I was wishing for, and all turned out well.

plum caramel layer cake
plum and ginger cake.jpeg
slice of plum cake.jpeg
plum caramel layer cake
plum cake top view

White Cake with Plum & Ginger Caramel and Plum Buttercream

Adapted from Stella Parks’ White Mountain Cake and Marshmallow Buttercream

For the buttercream:

  • 1 1/8 tsp powdered gelatin (1/2 envelope)

  • 2 tbs cool water

  • 1/2 tbs vanilla

  • 3/8 cup (3 oz) water

  • 1/4 cup + 3 tbs corn syrup

  • 1 cup sugar

  • 1/4 tsp kosher salt

  • 2 1/2 sticks unsalted butter, room temp

  • 1/4 cup plum & ginger caramel, recipe below

For the plum & ginger caramel (adapted from Food52):

  • 3/4 lb ripe, red plums, pitted and cut into wedges

  • 1 lbs lemon juice

  • 1 inch ginger, peeled and minced

  • 1/2 vanilla bean

  • 3/4 cup sugar

For the cake:

  • 2 cups bleached cake flour

  • 1 stick unsalted butter, room temperature

  • 1/3 cup coconut oil, room temperature

  • 1 cup plus 2 tbs sugar

  • 1 1/4 tsp baking powder

  • 1/2 tsp baking soda

  • 3/8 tsp kosher salt

  • 4 egg whites, room temperature

  • 1 tbs vanilla

  • 1 cup buttermilk, room temperature

  1. Make the marshmallow buttercream base: mix the gelatin powder, 2 tbs water and vanilla in a small bowl and set aside to bloom. In a pot over medium heat, combine the 3/8 cup water, corn syrup, sugar and salt. Stir with a fork until it bubbles, about 5 minutes, and then turn up the heat to medium-high. Let sit on the heat without stirring until the temperature reaches 250 degrees (see note).

  2. Transfer the sugar syrup to the bowl of a stand mixer, scraping out of the pot (be careful!). Let cool to 212 degrees, then add the bloomed gelatin. Using the whisk attachment, stir on low speed until the gelatin is fully melted into the syrup, then increase speed to medium high and whip the syrup until tripled in volume and thick, snowy marshmallow fluff, and the mixture starts to cling in a ball shape around the whisk. Scrape this mixture into a well greased 2-cup container and cover (grease the lid!) and set aside at room temperature for at least 2 hours.

  3. While marshmallow base is resting, make the caramel and the cake: add the plum wedges, lemon juice, and ginger to a blender and puree until very smooth. The plums should be ripe enough that no extra water is needed. Cut the vanilla bean in half lengthwise and scrape out the seeds.To a medium pot, add the seeds of the vanilla bean and the pod and the sugar, with 1/2 cup water. Bring to a boil, without stirring, and let cook until the mixture turns a deep amber, start checking for color at 10 minutes. Slowly whisk in the plum puree (it will bubble up!) and keep whisking until everything is combined and any hardened sugar has dissolved. Keep cooking over high heat until mixture thickens a bit, about 5 minutes more. Transfer to a bowl and set aside to cool completely.

  4. Make the cake: Heat oven to 350 degrees and line 3, 6-inch cake pans with parchment and grease the pans (or if you don’t have three pans, prepare 2 and bake in batches). In a bowl, sift the cake flour and set aside.

  5. To the bowl of a stand mixer, add butter, coconut oil, sugar, baking powder, baking soda, and salt and mix until with the paddle attachment on medium speed until fluffy, about 5 minutes. Add the egg whites and beat to fully combine, then add the vanilla.

  6. With mixer on low speed, add the 1/3 of the flour mixture and 1/3 of the buttermilk in alternate batches, starting with the flour and ending with the buttermilk. Divide batter between baking pans and bake 13-15 minutes, until golden on top and toothpick inserted in the middle comes out clean. Remove from pans and let cool completely on a wire rack.

  7. While cake layers are cooling, finish the buttercream: transfer the marshmallow base to the bowl of a stand mixer and begin to whip on medium with the whisk attachment. Slowly add the butter, 1 tablespoon at a time, waiting for each to incorporate before adding more. The mixture will loosen up as you go but will look awful at first, keep going! Once all the butter is incorporated, whip for another minute, scraping the bottom as needed to make sure you get all the butter combined with all the marshmallow. Add in the cooled plum caramel and whisk to fully combine.

  8. At this point, your buttercream should hopefully be thick, yet light and creamy. However, there’s a good chance it seems a little soupy, if your kitchen is very warm. Just refrigerate the bowl for 15 minute increments, whipping in between, until the buttercream is the right consistency.

  9. Assembly! Level your cooled cake layers, and frost the bottom layer with the buttercream. Using an offset spatula, create a shallow well in the center of the frosting and fill with more of the plum caramel. This creates a dam so the caramel doesn’t leak out the sides of the cake. Top with a second cake layer and repeat. Top with the third cake layer, and frost and decorate as desired!

Notes:

  • I really recommend using a digital thermometer that you can clip to the side of the pot or bowl for this recipe. The temperature and timing is crucial so you don’t want to be guessing with a regular candy thermometer.

In Recipes, Allie Dreams of Cake Tags Dessert
Comment

Grasshopper Layer Cake

June 30, 2020 Allie
Grasshopper cake

One of my favorite food memories of last year was the 70’s themed book club I hosted for my friends in December. I didn’t anticipate that by the time I got around to sharing that story, the idea of filling my apartment with 15 friends would be as retro as some of the items on the menu, but 2020 has warped things beyond all recognition.

I do hope to one day enjoy hanging out with my friends again in a socially acceptable way, but some of the food items I prepared for this particular party, maybe I don’t need to enjoy again? I mean, pigs in blankets and BBQ meatballs are still classics for a reason, but I can see why pineapple cheese balls aren’t still trending.

And, let me just tell you now that no, you do not need to, nor should you ever try, to recreate the sandwich loaf, a monstrosity you’ll find in various 70’s Cocktail Party listicles. No one will eat it and all you will have for your efforts is layers of egg salad and white bread in a shame corner in your fridge.

Do you hear me? DON’T TRY IT.

One good thing that came out of this culinary experiment was a reminder that grasshopper brownies are pretty excellent! We used to make them when Claire and I were kids, and I always felt so daring when we’d bring down the bottle of creme de menthe stashed above the fridge. We were baking with alcohol! Never mind that you won’t use enough of the stuff to endanger anyone of any age, and the liqueur is really there more to add the signature green color.

The brownies were, predictably, a hit at the party. My friend Susan kept telling me how much she loved them even weeks later, so I of course started wondering if I could turn them into a cake somehow for her February birthday. But we went to Florida, and then we all know where the end of February took us, so the cake never happened.

But I am really terrible at dropping things. I kept thinking about the grasshopper cake, and finally, because I had all this time and most of a bottle of creme de menthe still sitting on my bar, I just went ahead and made it. And I’m so pleased with how it turned out! I went for the Milk Bar approach with assembly, to highlight what I think is the spirit of the grasshopper brownie: the layers of ganache, mint filling and chocolate brownie all on display. Besides, this cake is rich anyway, so there’s absolutely no need for frosting the outside.

I also tried out the Milk Bar chocolate cake recipe in this too, which turned out to be the perfect choice for two reasons: the cake isn’t very rich or super chocolatey, so is actually the perfect counterpart to the extremely rich buttercream filling, and to make the chocolate cake, you have to first make chocolate fudge. This gives you enough left over to dollop inside the cake, adding an extra hit of fudgey chocolate, to call to mind the brownie inspiration of this cake. The buttercream filling is the best version of the grasshopper layer I’ve come across. It’s sweet and rich but not teeth curling the way some older recipes can be. I topped all those layers off with a splatter of homemade magic shell, and voila, this cake is ready to party like it’s 1975!

I think it would be a great, easy bake for the upcoming holiday, if you are taking a break from the red food dye this year.

grasshopper layer cake
decorating grasshopper cake
sliced grasshopper cake

Grasshopper Cake

Cake layers adapted from Milk Bar, grasshopper filling from the New York Times. Yes, the milk bar recipes call for glucose, but that is found easily online or you can sub corn syrup if you need to.

Serves 8

For the fudge sauce:

  • 1 oz quality dark chocolate, chopped

  • 2 tbs cocoa powder

  • 1/8 tsp kosher salt

  • 1/4 cup glucose (or 2 tbs corn syrup)

  • 2 tbs sugar

  • 1/4 cup heavy cream

For the chocolate cake:

  • 1 1/4 cups all purpose flour (or cake flour, I used what I had on hand)

  • 1/2 cup cocoa powder

  • 1 1/2 tsp baking powder

  • 1 1/2 tsp kosher salt

  • 1 stick unsalted butter, softened

  • 1 1/2 cups sugar

  • 3 eggs

  • 1/2 cup buttermilk

  • 1/4 cup neutral oil, such as canola or grapeseed

  • 1 tsp vanilla

  • 3 tbs fudge sauce

For the buttercream:

  • 1 stick unsalted butter, softened

  • 2 tbs cream cheese, softened

  • 2 tbs creme de menthe

  • 1/2 tsp peppermint extract

  • pinch of kosher salt

  • 2 cups powdered sugar

For assembly and decorating:

  • 1/4 cup milk

  • 1/2 tsp peppermint extract

  • 6 inch cake ring

  • acetate or parchment paper

  • 1/4 cup dark chocolate, chopped

  • 1 tsp coconut oil

  1. Make the fudge sauce: Combine the chocolate, cocoa and salt and in a bowl and set aside. In a small sauce pan, combine the glucose, sugar and heavy cream and bring to a boil, stirring occasionally. Once it boils, pour over the chocolate and cocoa let sit for a full minute. After one minute, slowly start to whisk everything together, gradually increasing your speed, until you have a glossy, smooth fudge sauce. This should take a few minutes, depending on how fast and vigorously you whisk. Set aside or refrigerate if you are making ahead. You will want to bring it up to room temperature before using to make the cake.

  2. Make the cake: Heat oven to 350 degrees, spray a quarter sheet pan with cooking spray and line with parchment. Set aside. In a bowl, combine the flour, cocoa, baking powder and salt and whisk to combine. Set aside. In the bowl of a stand mixer, add the butter and sugar and beat together for 3 minutes on medium-high speed with the paddle attachment. You’ll want to make sure the butter is completely softened for this. Add in the eggs, and mix again on medium-high for 3 minutes, and scrape down the sides of the bowl with a spatula.

  3. Turn the mixer on low speed and add in the buttermilk, oil, and vanilla. Increase speed to medium high and beat for another 3-5 minutes, until everything has doubled in volume and the mixture is completely combined, with no visible streaks. Add the fudge sauce and mix on low until combined. Add the dry ingredients and mix on low for about a minute, just until everything comes together. Scrape down the bowl and mix on low again to finish combining.

  4. Spread the batter in the prepared pan and bake 30-35 minutes, until puffed and the top of the cake bounces back when gently pressed with a finger. Cool completely before assembling the cake.

  5. Make the buttercream: beat the butter and cream cheese together, using either a stand mixer with the paddle attachment or hand mixer. Once smooth, add the creme de menthe, peppermint extract and salt and mix again until smooth. On low speed, slowly add the powdered sugar. Once all the powdered sugar has been added to the bowl, increase the speed and beat until smooth and fluffy. You should have a light, spreadable mixture. Taste, and adjust with more peppermint extract if you like it more minty.

  6. Assemble the cake: In a small bowl, combine the milk and the peppermint extract. Using the cake ring, cut 2 full 6-inch rounds out of the cooled cake, one at the top left corner and one at the bottom right corner. Cut 2 half circles out of the remaining cake, and clean the cake ring. Line the sides of the cake ring with acetate or parchment paper. Place those half circles in the lined cake ring and fill in the middle gap with as some of the remaining cake scraps. Press it together to form the bottom layer and using a spoon or pastry brush, evenly douse with 1/3 of the milk mixture. Top with 1/3 of the buttercream and spread into an even layer, then dollop with fudge sauce. Top with a second layer of the cake and line with another circle of acetate or parchment. Douse this layer with 1/3 of the milk mixture, spread with 1/3 of the buttercream, and dollop with fudge sauce. Top with your third and final cake layer, douse with remaining milk mixture and spread remaining buttercream on top. Place cake in the freezer to chill until firm, overnight if you can.

  7. Once cake is chilled, to decorate the top, you can use any remaining warmed fudge sauce or do as I did, and melt together some chocolate and coconut oil and splatter over the top. The magic shell will harden on the chilled cake, and I like the texture contrast this extra type of chocolate adds to the top.

  8. To serve, slide the metal ring off the cake and remove the acetate or parchment. Let warm up a bit and slice and serve!

In Recipes, Allie Dreams of Cake Tags Dessert
Comment

A Simpler Cake for the Fourth

June 28, 2019 Allie
red white blue funfetti cake

Hi!

We’ve got America’s most red, white & blue day coming up next week, and probably also some socializing or outdoor BBQ-ing and celebrating, so let’s make some cake, shall we?

Don’t worry, though, I realized last year the limits of my capacity for digesting blue food dye and for my patience levels, so I won’t be revisiting the flag cake. I think that’s a once-every-five-years kind of project for me. No, this year, I wanted something a little simpler.

For that, I dove back into my archives, and updated the easiest funfetti cake ever with a patriotic twist! Red, white, and blue star-shaped sprinkles exist, and they went into and atop this cake, along with swirls of red and blue tinted frosting, all tied together in an easy to cut (and assemble), rectangular package. Gotta sneak that flag shape in there somehow!

As for the frosting, I was going for a sort of ombre effect of red to white to blue, but I layered the red into the piping bag first. As you can see from the photos, the red really makes itself known! But I promise it still tasted delicious, and that’s the point of cake, right? So, since this cake is so dead simple to make, have fun, play a little, and if it doesn’t come out perfectly the way you planned, well, neither did America, so eat it anyway!

red white blue cake
building red white blue funfetti cake.jpg
patriotic funfetti batter.jpg
red white blue frosting.jpg
Red white blue sprinkles.jpg
patriotic funfetti cake
Sliced red white blue funfetti cake

Red, White & Blue Sprinkle Cake

Cake layers adapted from Christina Tosi.

For the cake:

  • 1/2 stick unsalted butter, softened to room temp

  • 1/3 cup vegetable shortening

  • 1 1/4 cup granulated sugar

  • 3 tbs, tightly packed, light brown sugar

  • 3 eggs

  • 1/2 cup buttermilk

  • 1/3 cup grapeseed oil

  • 2 tsp clear imitation vanilla

  • 2 cups cake flour

  • 1 1/2 tsp baking powder

  • 3/4 tsp kosher salt

  • 1/4 cup plus 2 tbs red, white & blue sprinkles (see note)

For the swiss meringue buttercream:

  • 4 egg whites

  • 1 1/4 cup sugar

  • 3 sticks butter, unsalted, room temp

  • 1 tsp clear imitation vanilla

For assembly:

  • 1/4 cup milk

  • 1 tsp clear imitation vanilla

  • more sprinkles, for decorating

  1. Bake the cake: Heat oven to 350 degrees. Spray a quarter sheet pan with cooking spray and line with parchment. Set aside.

  2. In the bowl of a stand mixer, combine the butter, shortening, and sugars and beat on medium-high for 2-3 minutes, scraping down as needed, and then add the eggs and beat another 2-3 minutes on medium-high.

  3. Turn the mixer to low and pour in buttermilk, oil and vanilla extract. With speed on medium-high, beat for 4-6 minutes, until the mixture is very, very pale, almost white, and almost doubled in size. When you see no more streaks of fat or liquid in the batter, it is ready for the dry ingredients. Add the cake flour, baking powder and salt, as well as the 1/4 cup of sprinkles, and mix for no more than a minute, just until everything comes together.

  4. Spread the batter evenly into the prepared cake pan and then sprinkle with remaining sprinkles. Bake 30-35 minutes, until puffed and no longer jiggling in the middle. Cool cake completely in the pan, on a wire rack.

  5. Make the frosting: Set bowl of mixer over a pot of simmering water, and add the egg whites and sugar and whisk to combine. Continue whisking until sugar dissolves and mixture is very warm to the touch, or reached 160 degrees on an instant read thermometer.

  6. Transfer bowl to stand mixer and beat egg white mixture with the whisk attachment on high speed to stiff but not dry peaks. Continue beating until fluffy and cooled, 6 minutes.

  7. Switch to the paddle attachment and beat on medium-low speed, adding the butter a bit at a time, beating well after each addition. Beat in the vanilla and then beat on low speed for about 2 minutes more, to reduce any air bubbles.

  8. To assemble: using a ruler or other straightedge as a guide, cut the cooled cake into quarters (you can stack all four layers or freeze one for later use or snacking, as I did). Place your first quarter onto a cake plate or decorating stand.

  9. In a small bowl, mix together the milk and vanilla, then brush 1/3 of the mixture onto the cake layer. Spoon a layer of frosting over the soaked cake, then sprinkle with a few more sprinkles. Top with the next cake layer and repeat. Top with remaining cake layer, brush on remaining milk soak, and then frost the cake as desired. You should have enough frosting to fully cover and do some fun piping if you want. Top with more sprinkles and enjoy!

Notes:

  • I used these sprinkles

  • For the ombre or multi-colored piping effect, dye some of your frosting to desired hues of red and blue, about 1/4-1/2 cup for each color. Layer with remaining white frosting into a piping bag fitted with a star tip, and pipe swirls to your heart’s content.

In Recipes, Allie Dreams of Cake Tags Dessert
1 Comment
Older Posts →

For those who plan their next meal while eating the last.


INSTAGRAM

🎶When pizza’s on a bagel*, you can have pizza anytime**!🎶

*donut
** after you fry some donuts
FINALLY perfected these Burnt Honey Butter Biscuits & what good timing! It’s carb season & we are all hibernating! 🐻
Final thoughts on Small Thanksgiving: take your sweet potato + marshmallow combo firmly into dessert or even breakfast, and consider a cozy mashed potato soup with stuffing croutons to use up those leftovers. Stay safe & Happy Thanksgiving! 😷🦃
Part 2 of Small Thanksgiving: all the stuff to stuff yourself with! An Italian sausage pasta-inspired stuffing and a vegetarian, spiced wild rice stuffed squash. Everything serves 4-6, gather safely this year! 😷🦃 #thanksgiving #smallthanksgiving #v
Now that we (and the world?) can let out that collective sigh of relief, I can  finally think about my favorite holiday! Everyone is probably (hopefully 😷)looking at smaller gatherings this year, so I’m sending some Small Thanksgiving ideas ou
So happy Disney keeps justifying my dumb baking purchases! This matcha shortbread is delicious, but make a good sandwich cookie it does not. I hid all the broken pieces 🙈
Subscribe to Tea and Fog!

RECENT RECIPES

Featured
polenta with rosemary and goat cheese.jpeg
Salmon Wellington and Warm Rice Salad.jpeg
Pizza Donut Hero.jpeg
Burnt Honey Butter Biscuits.jpeg
Mashed Potato Soup with Stuffing croutons.jpeg
sweet potato donuts with marshmallow frosting.jpeg