• Home
    • Recipes
    • The Roast Chicken Project
    • Allie Dreams of Cake
    • Sunday Suppers
  • Travel
  • About
Menu

Tea and Fog

Street Address
City, State, Zip
Phone Number

Your Custom Text Here

Tea and Fog

  • Home
  • Recipes
    • Recipes
    • The Roast Chicken Project
    • Allie Dreams of Cake
    • Sunday Suppers
  • Travel
  • About

Basque-Style Cheesecake

September 18, 2020 Allie
Basque-style Cheesecake

Have you heard of burnt cheesecake? I hadn’t, and apparently I’ve been living under a rock until this year, because this cheesecake is all over the internet. It may have originated in Spain, but apparently the style is very popular in Japan, and on Pinterest, and Instagram, and everywhere except where I've been looking, I guess. But the pandemic has a way of really forcing us to stop and look around, and so I’ve been made aware!

The culprit was my local paper, the San Francisco Chronicle, which I almost never read, because I don’t subscribe and I can always get the breaking news on Twitter. But it was on Twitter where I saw a story tweeted out on a new, coveted cheesecake in the Bay Area, based on this style of cheesecake. At first I thought, well, I can just go buy a cheesecake! Then I realized that no, I couldn’t, because these cakes have a cult following now and limited supply, and even if I managed to move up the waitlist, did I really want a 10-inch cheesecake? Well, maybe. But certainly I don’t need one.

Luckily, the Chronicle also followed up with the recipe. The ingredient list is short, the method seemed simple, and I happen to know that my oven is pretty great at burning things! So of course I decide to make it myself. Just a lot smaller.

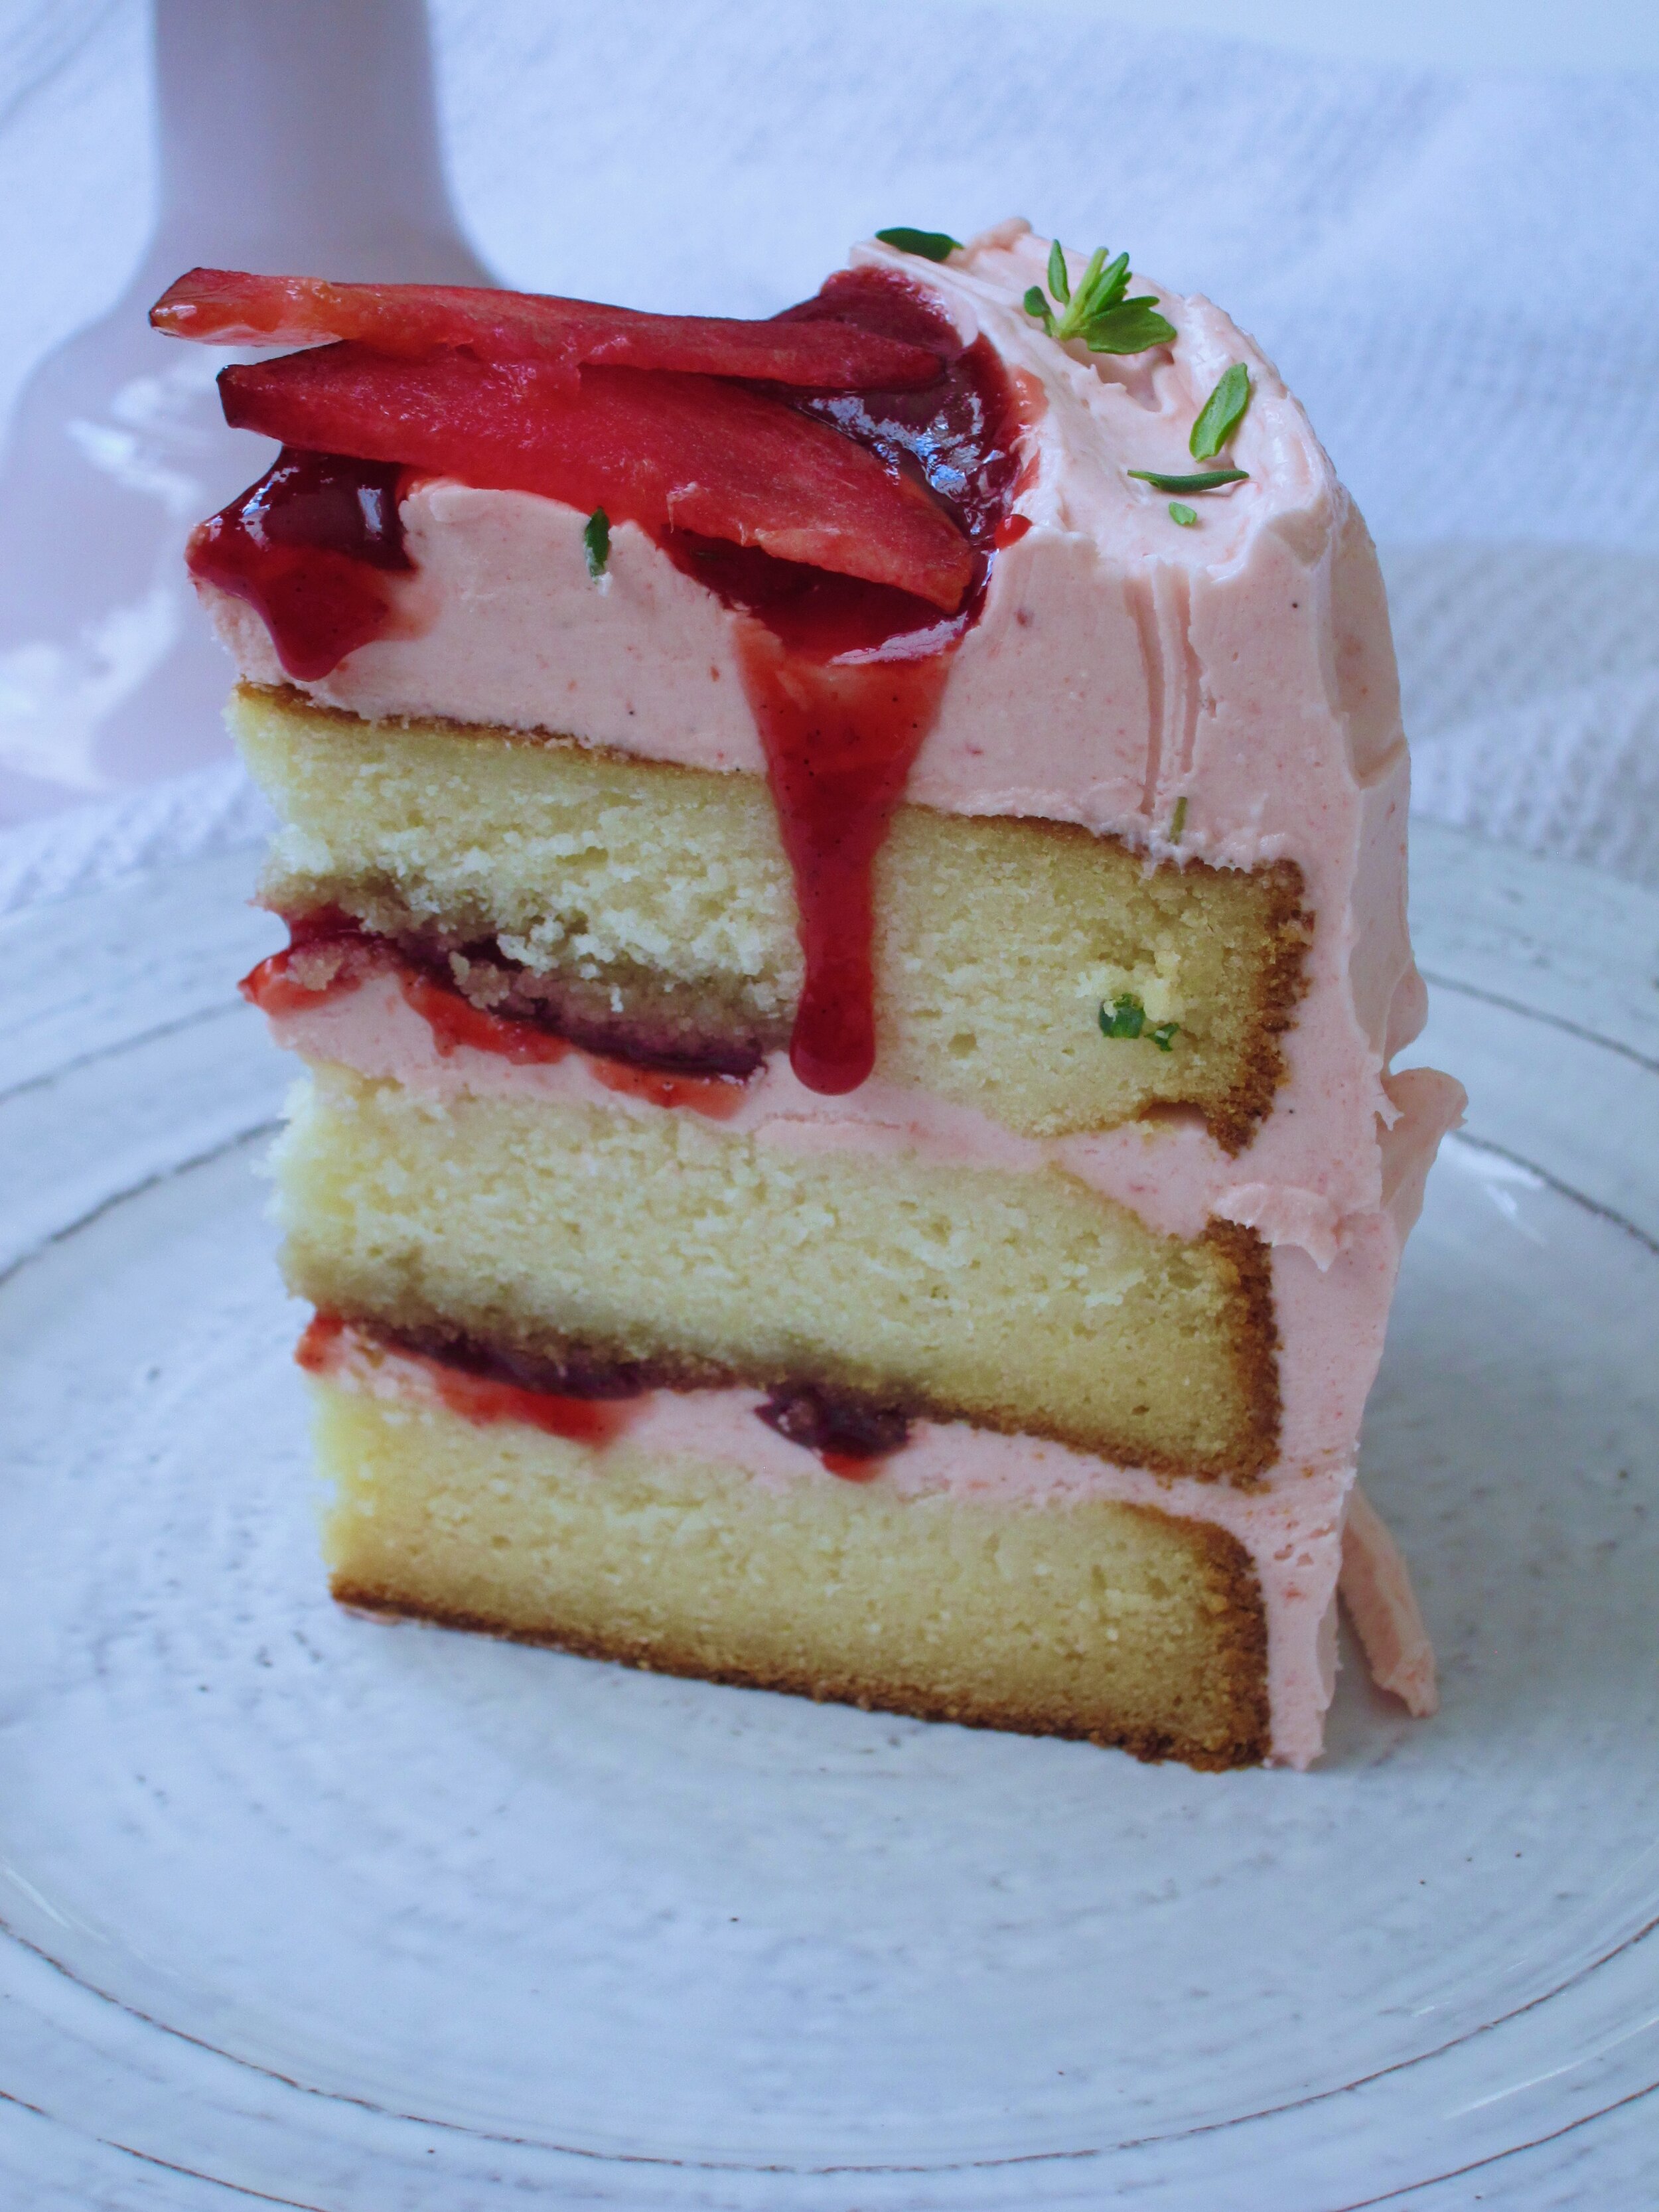
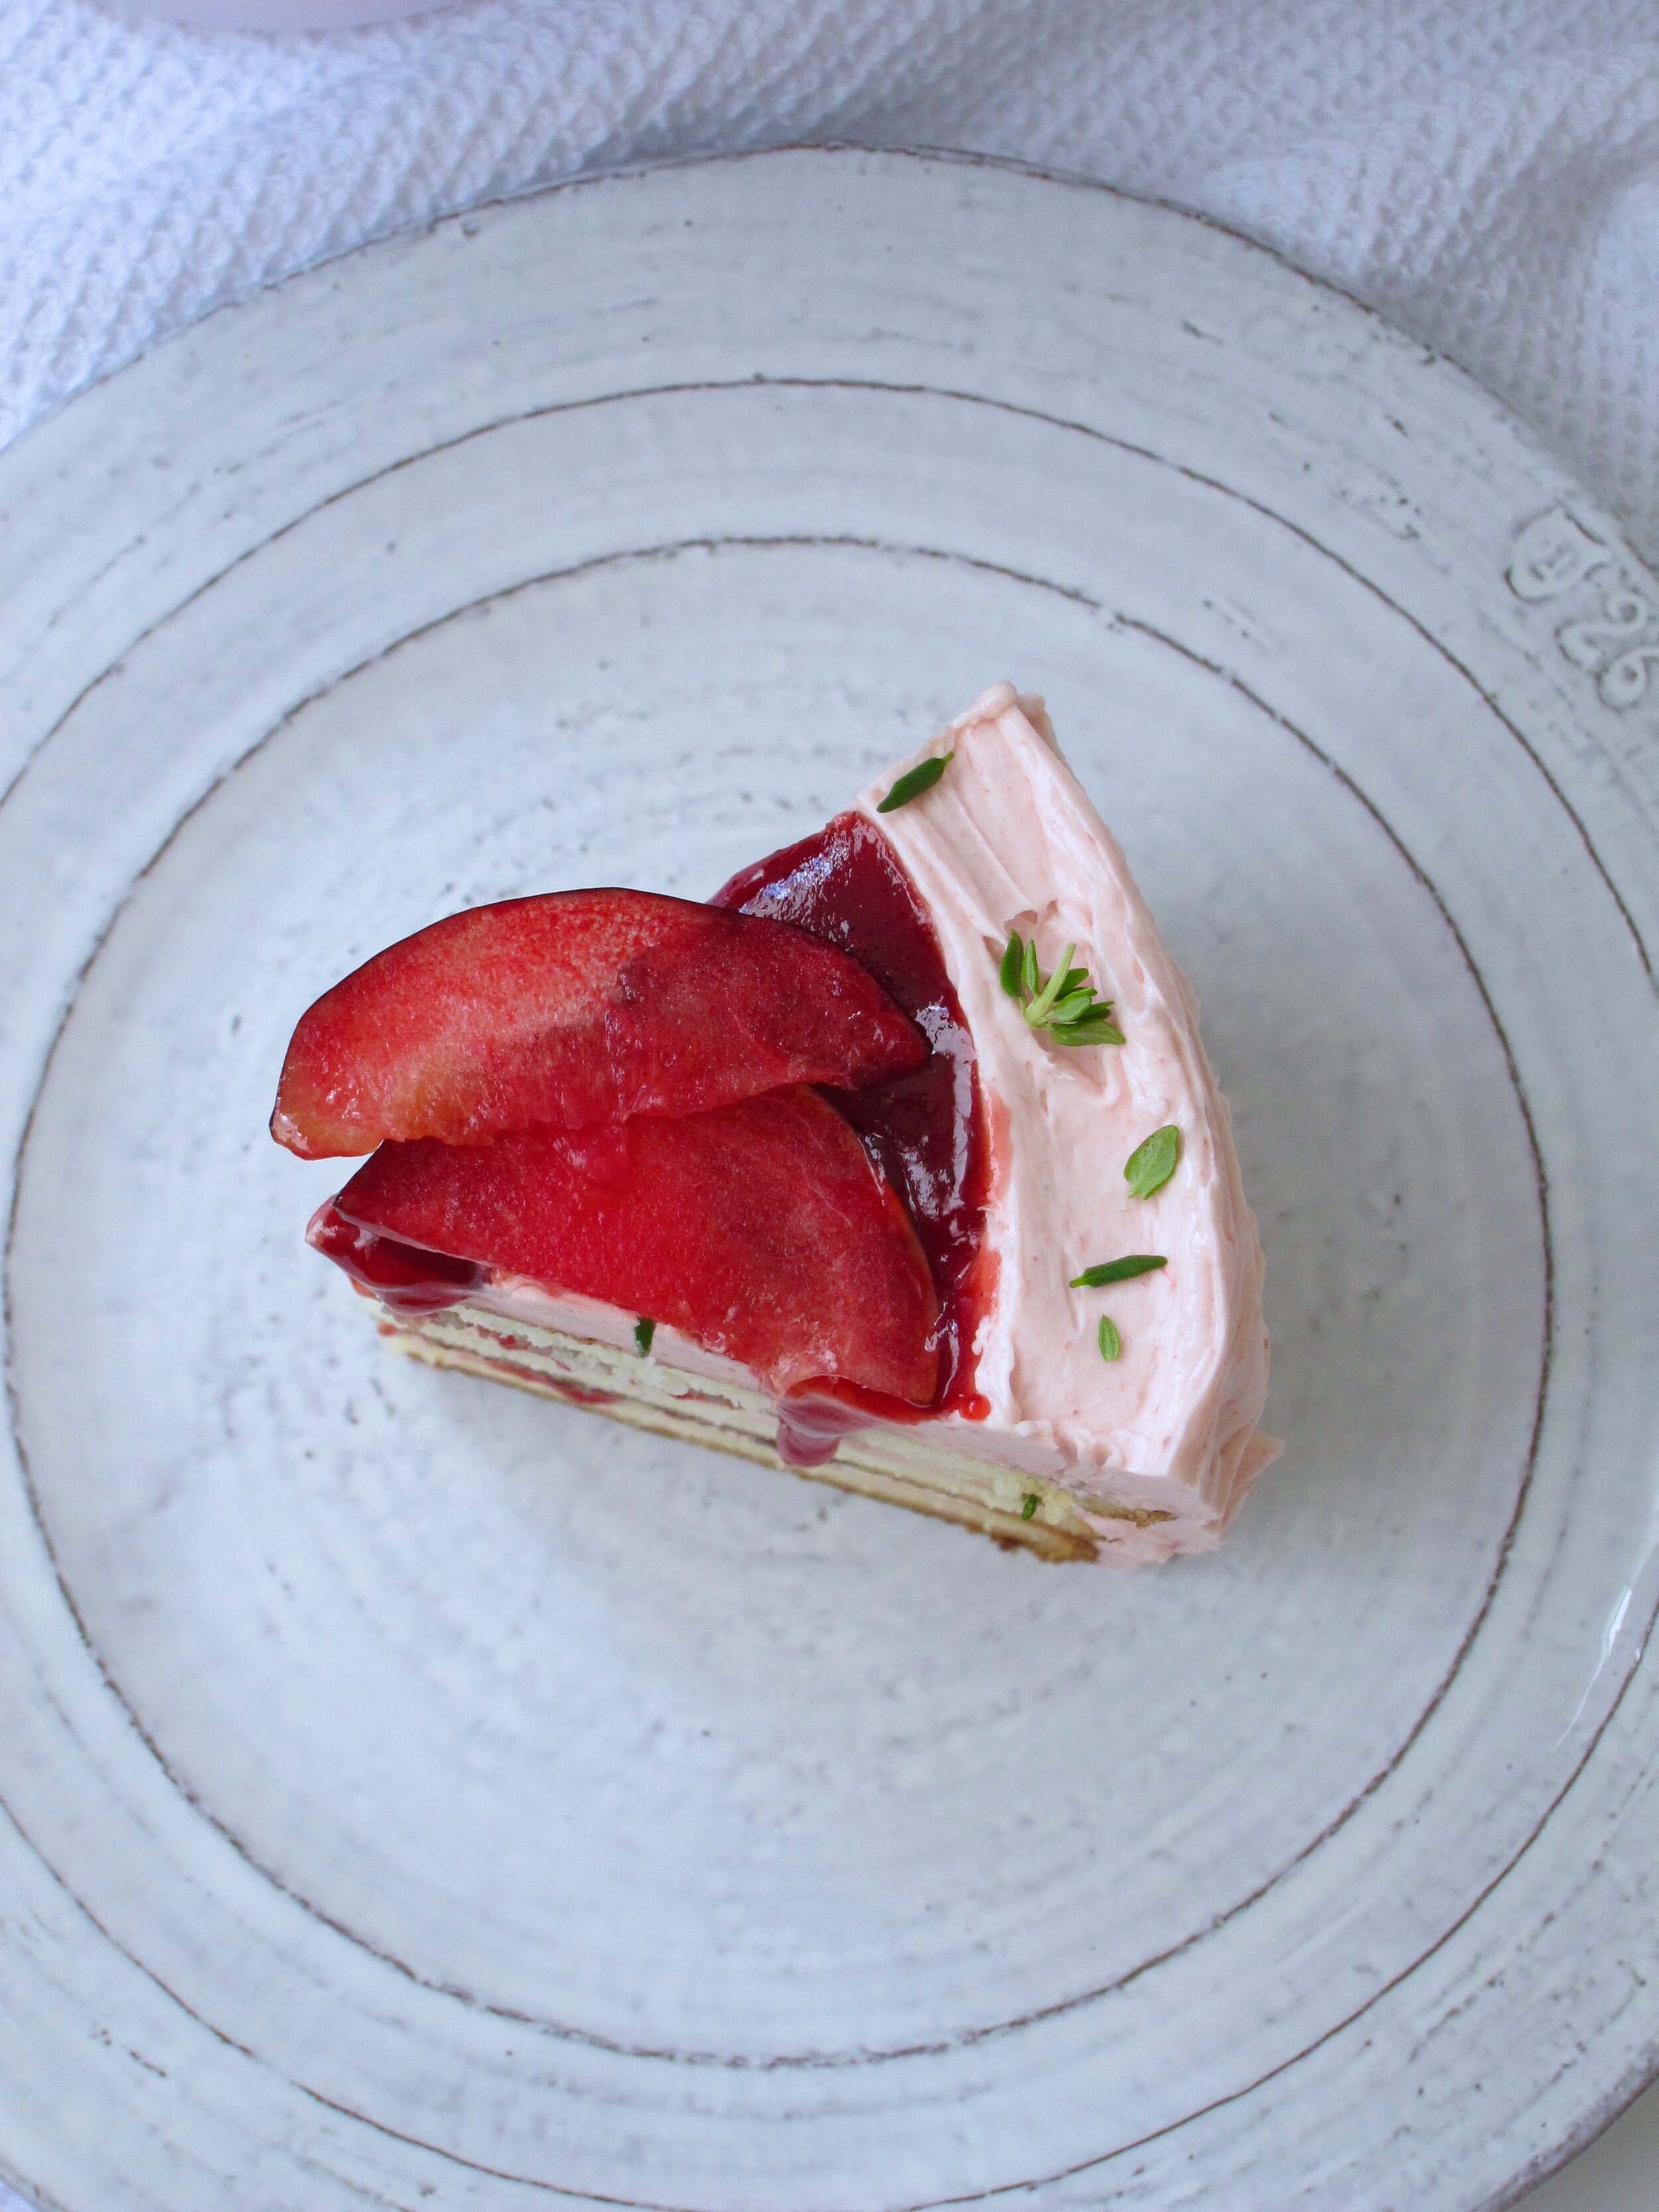
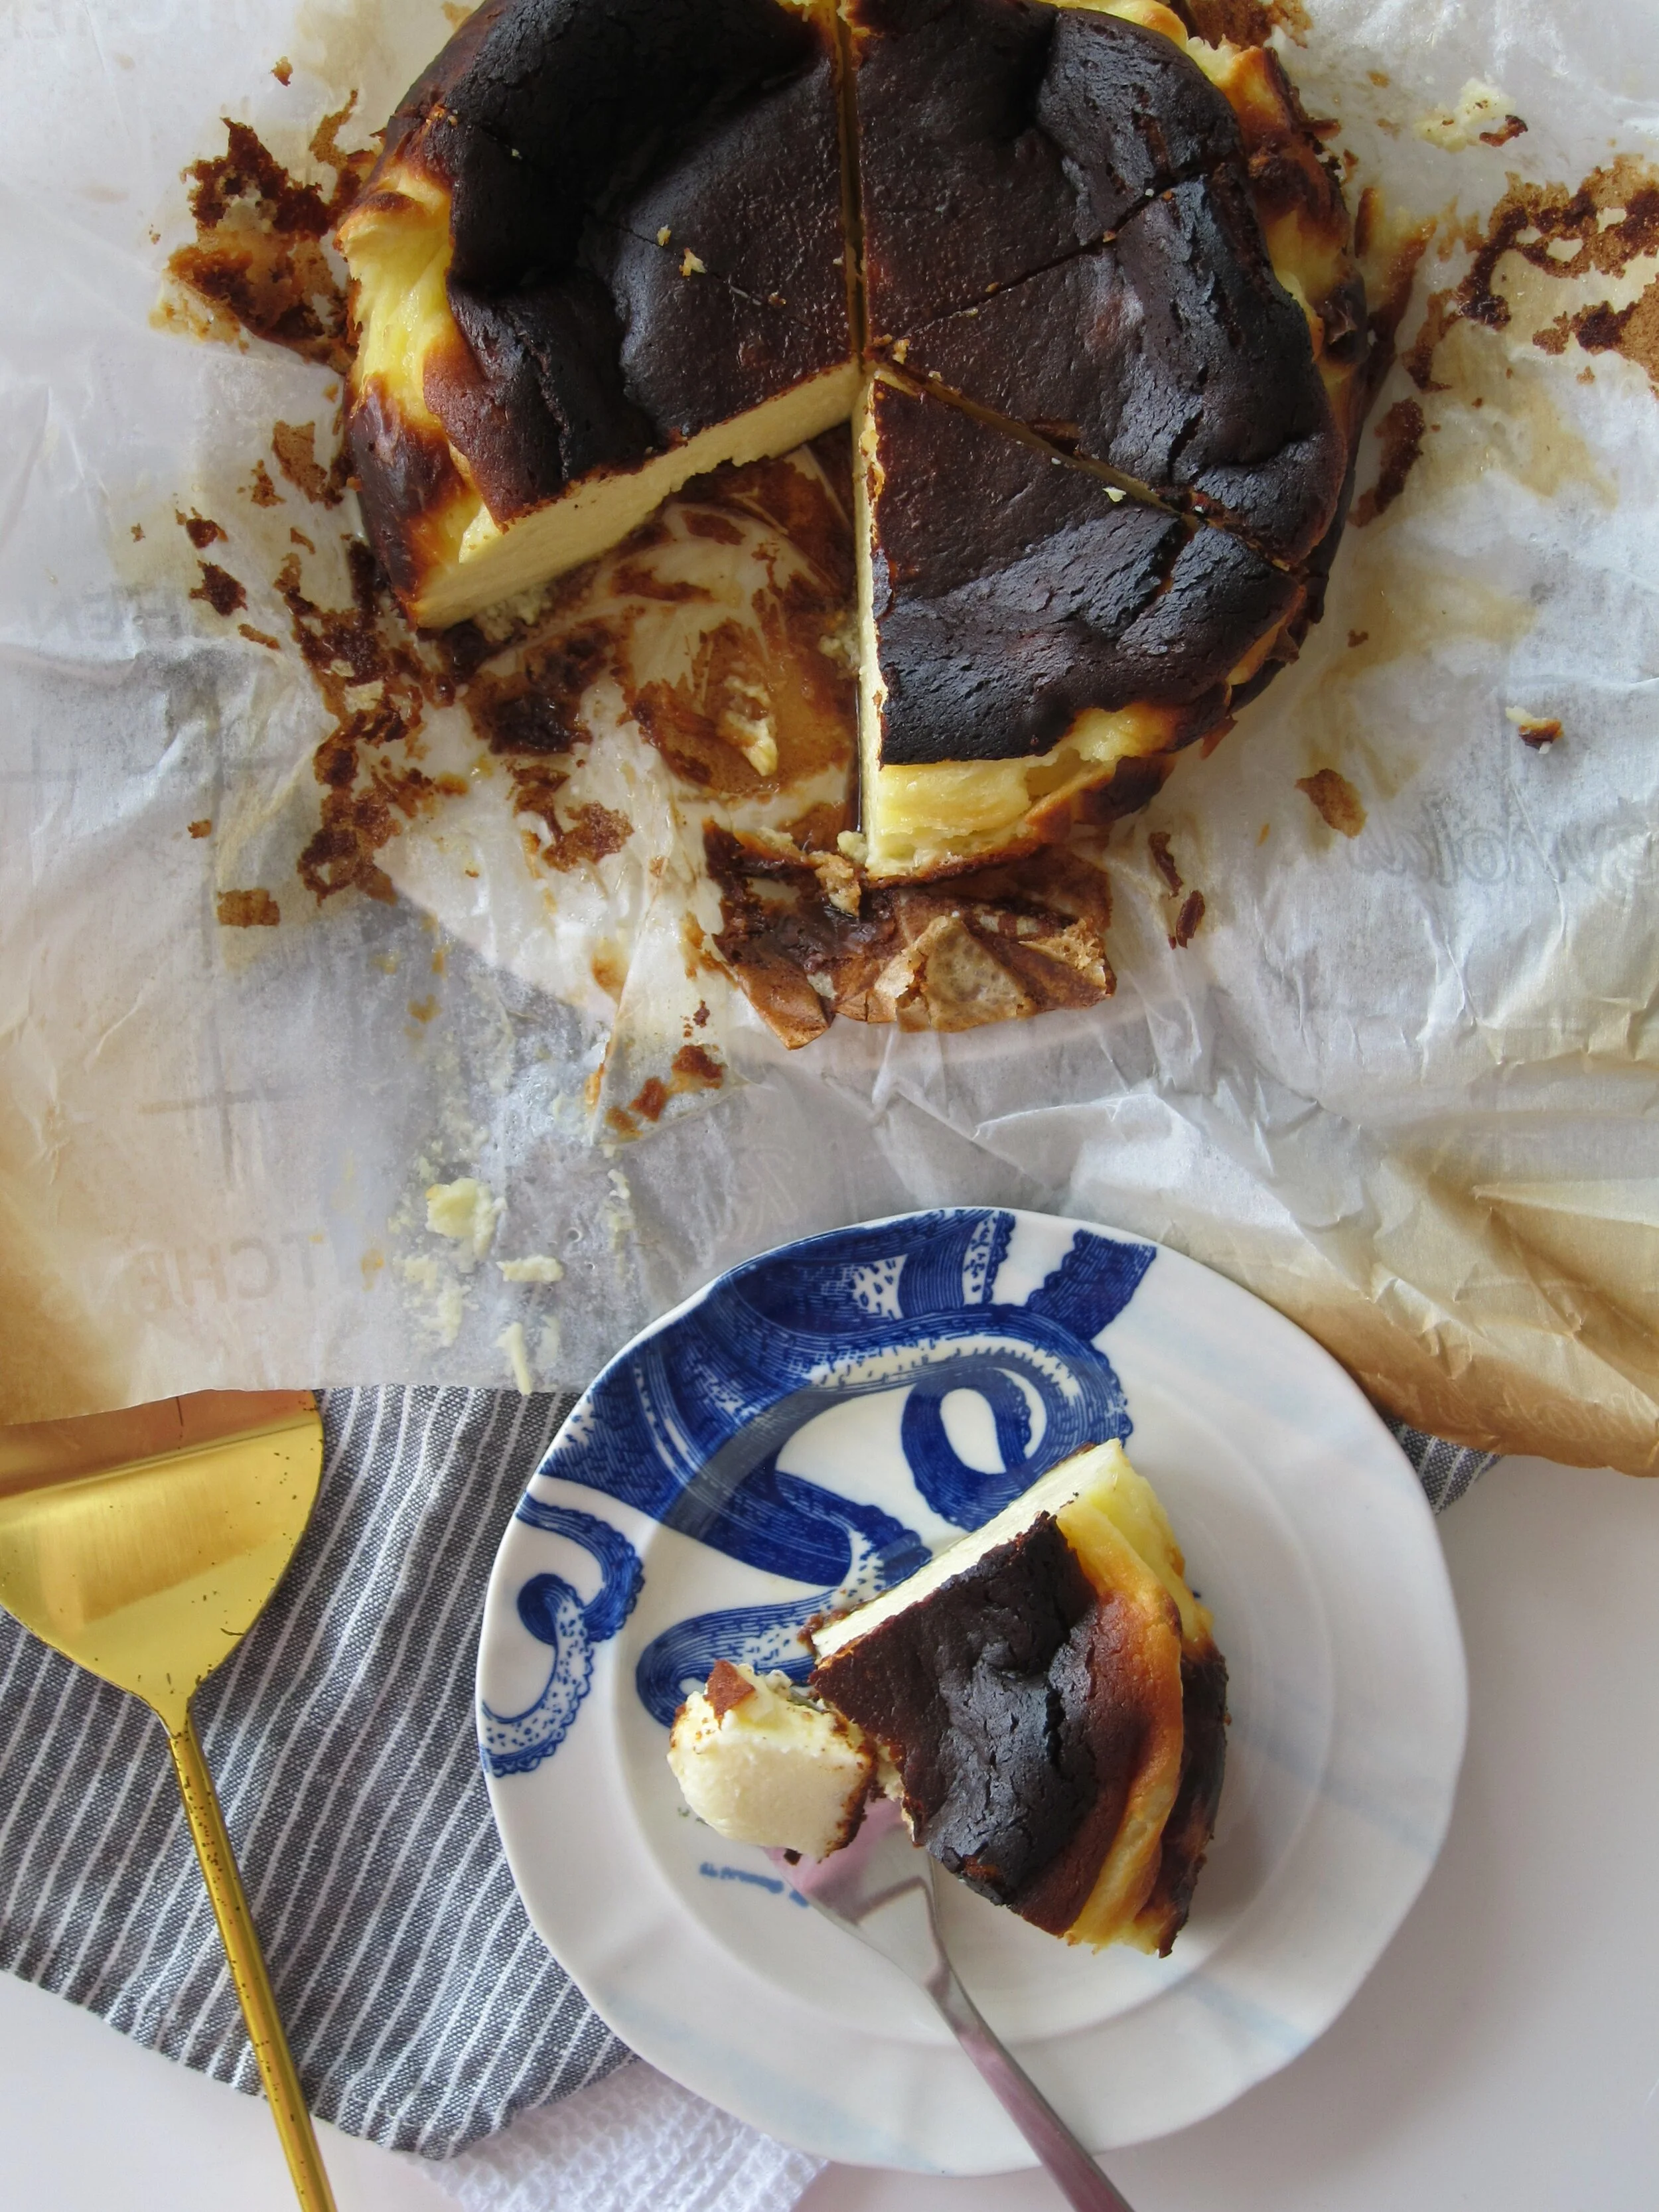
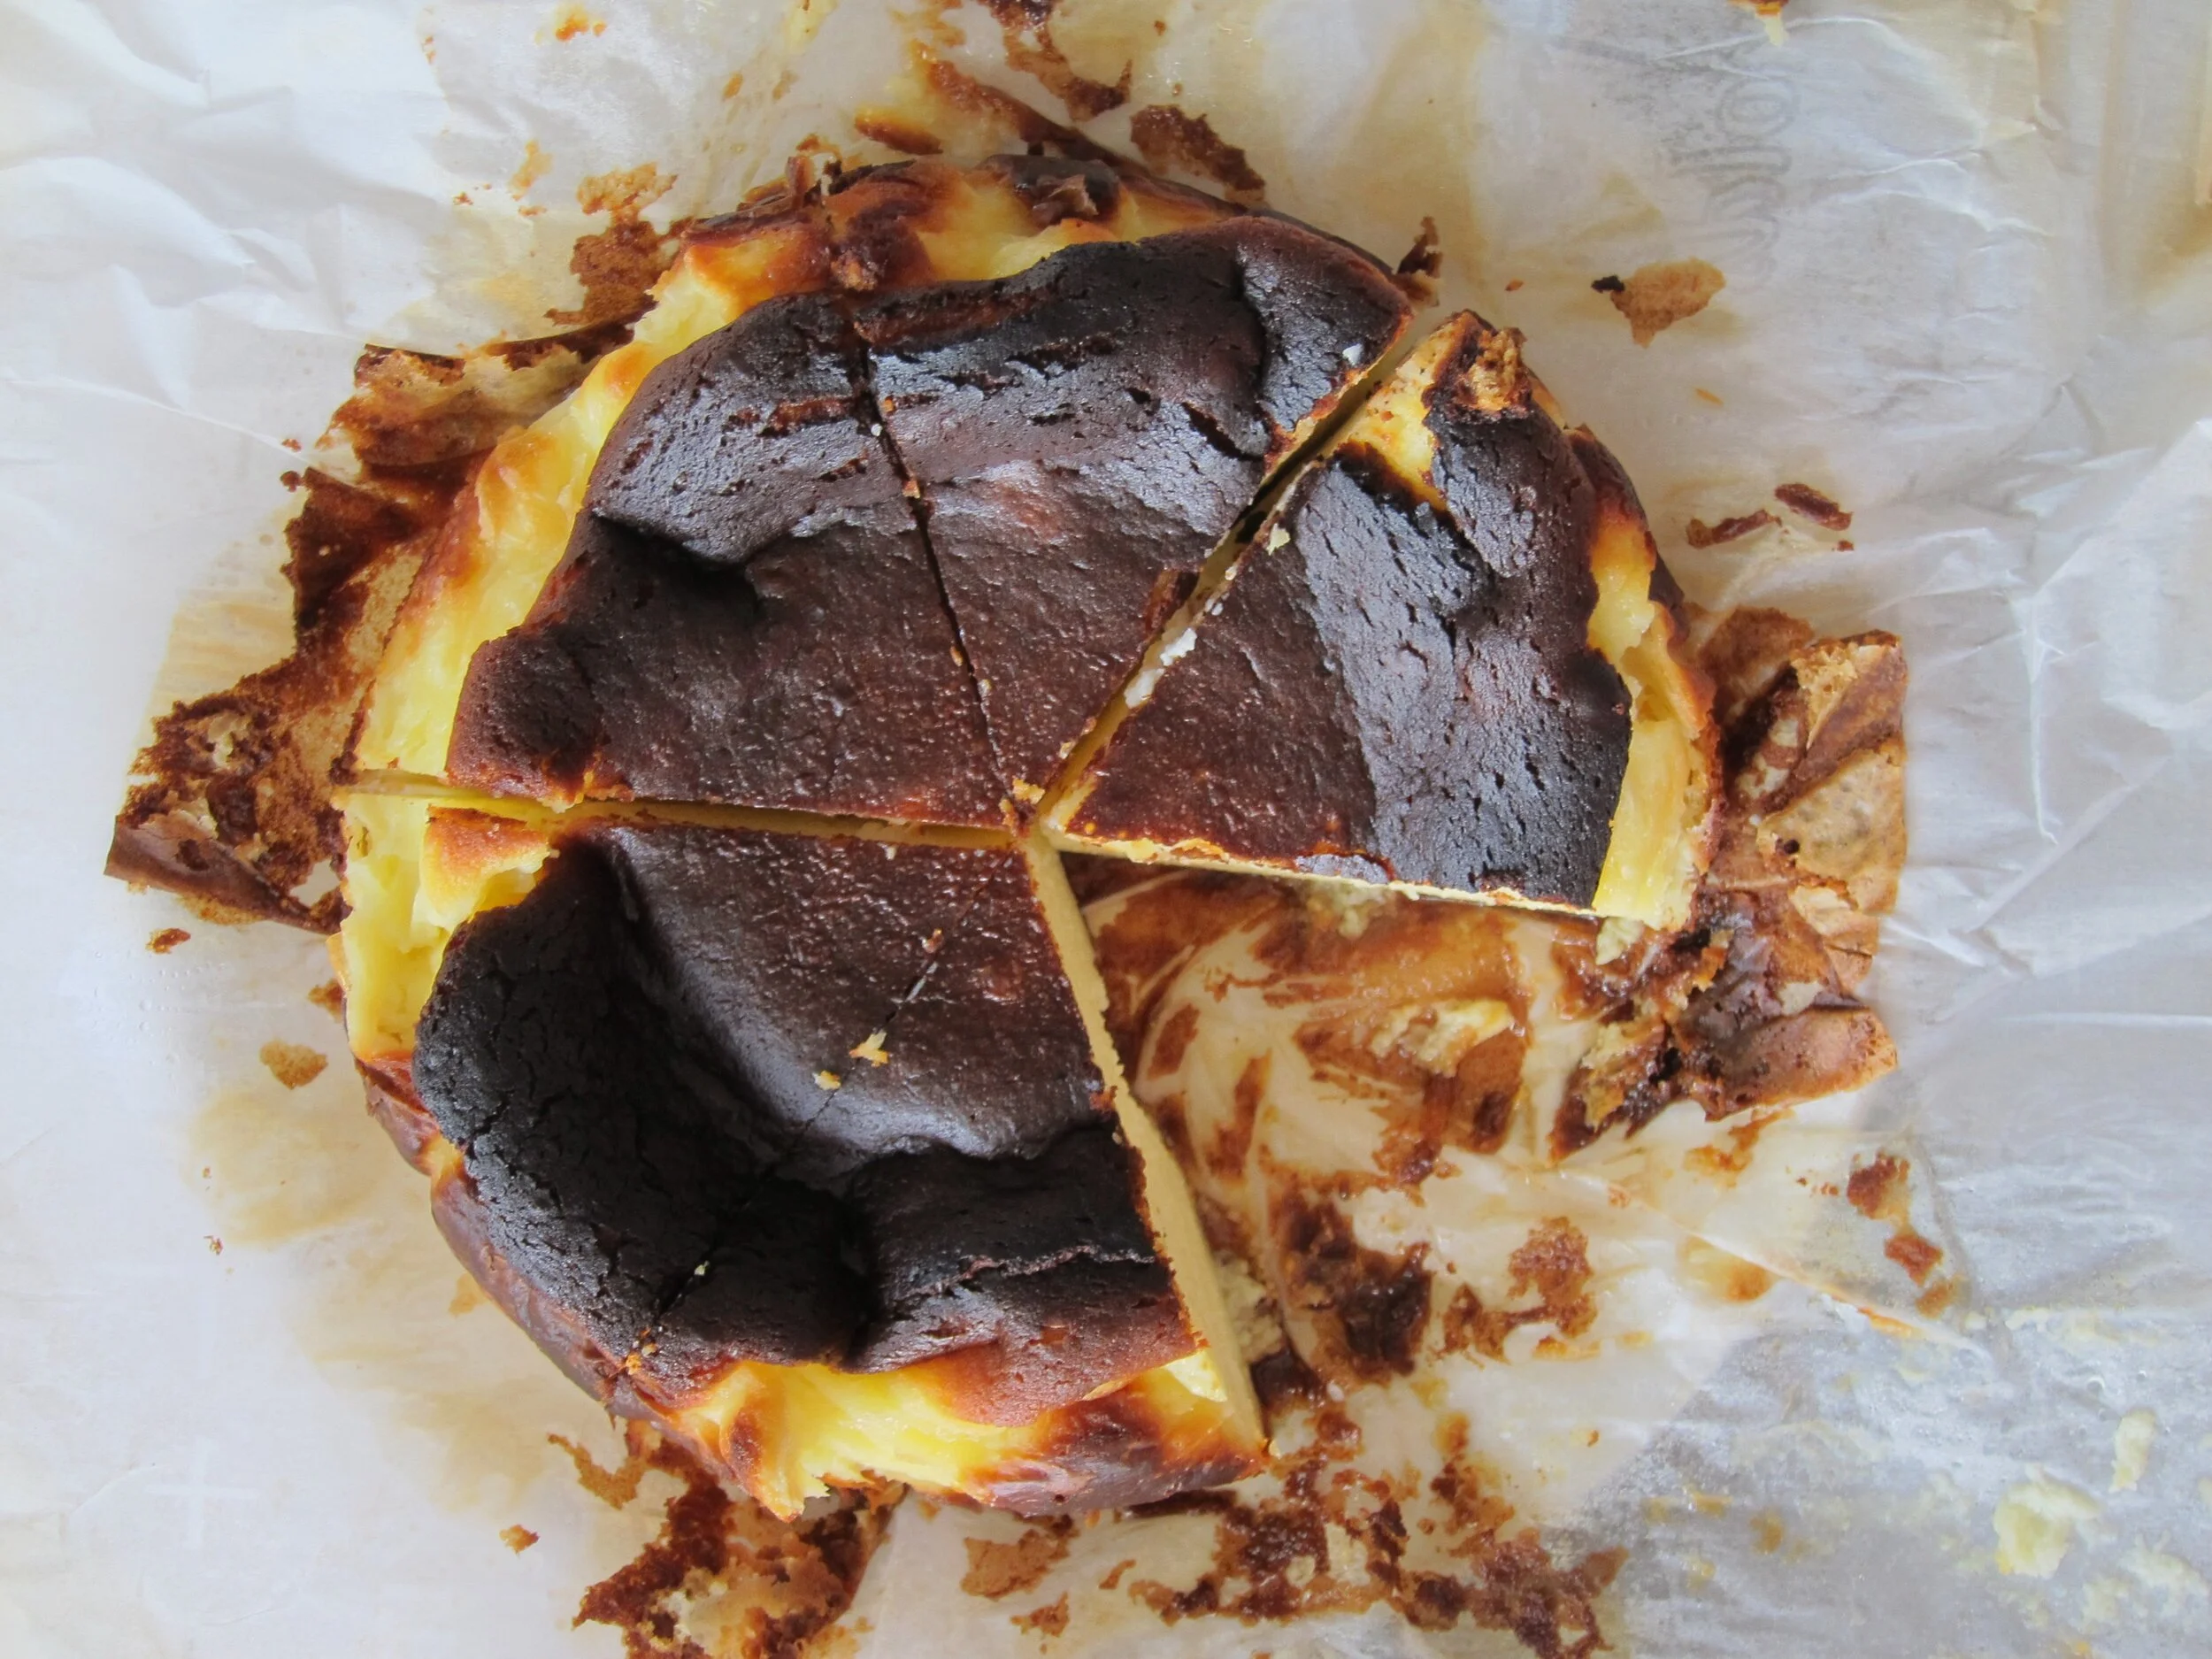
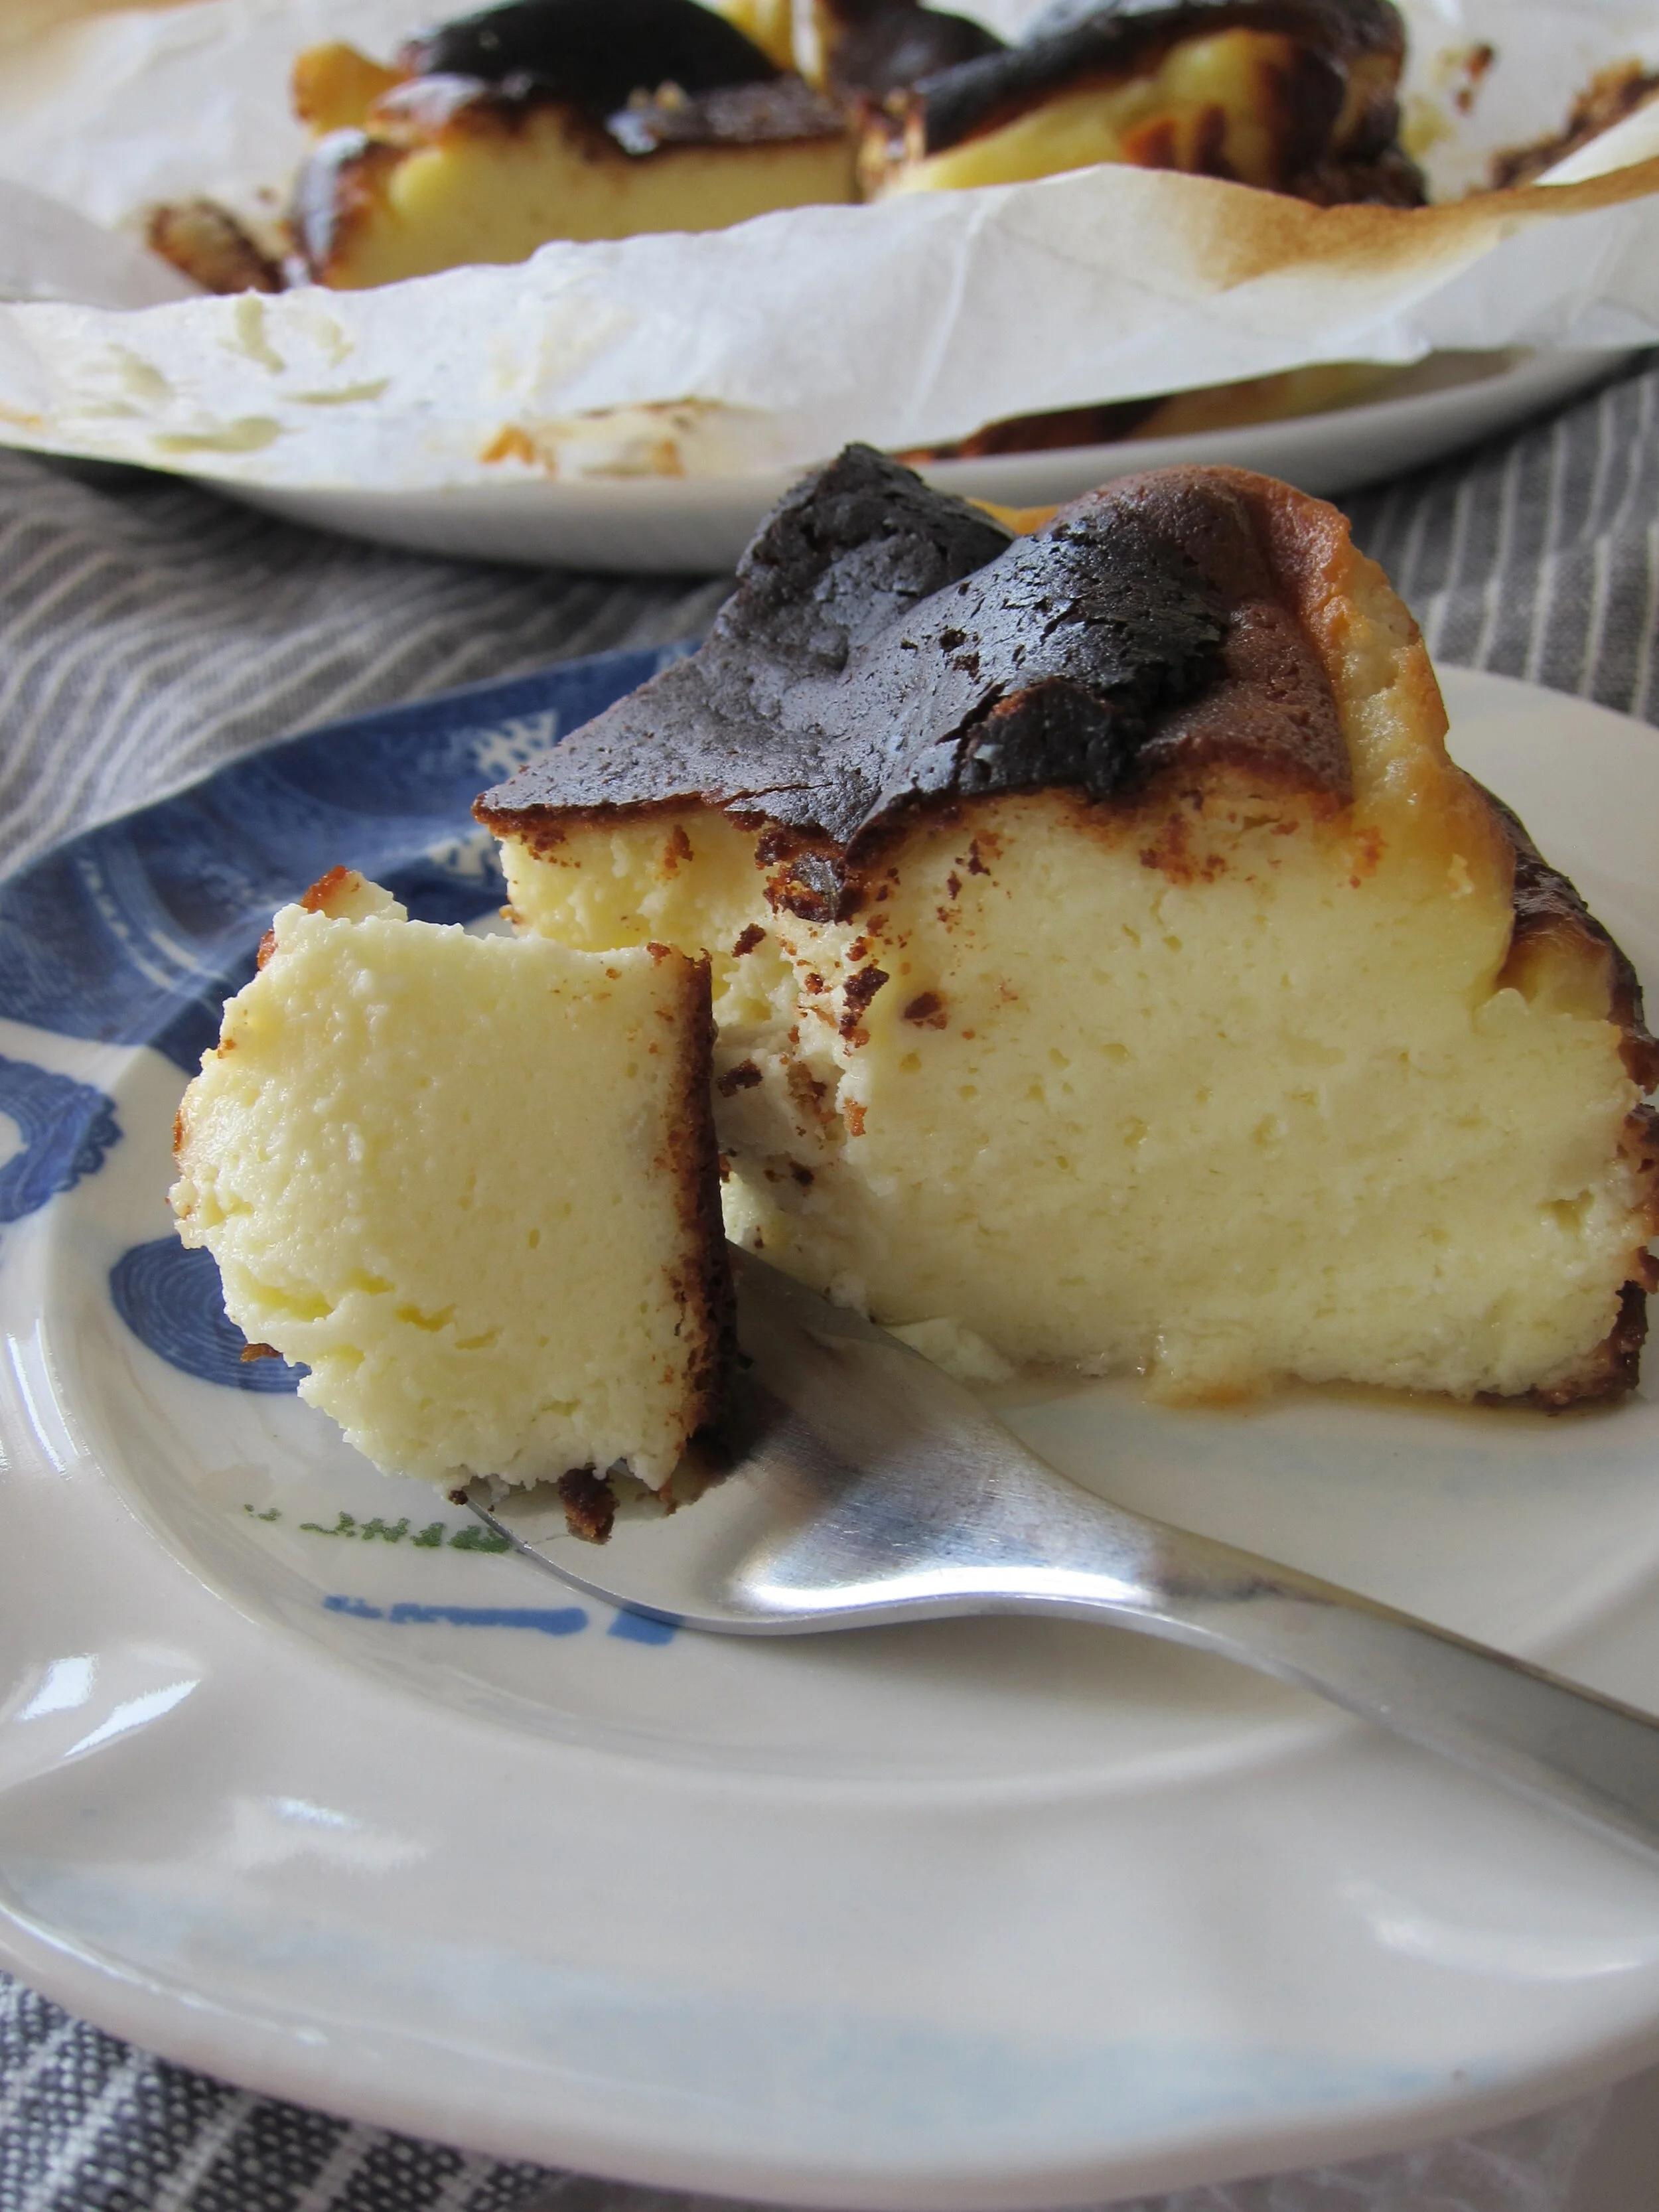
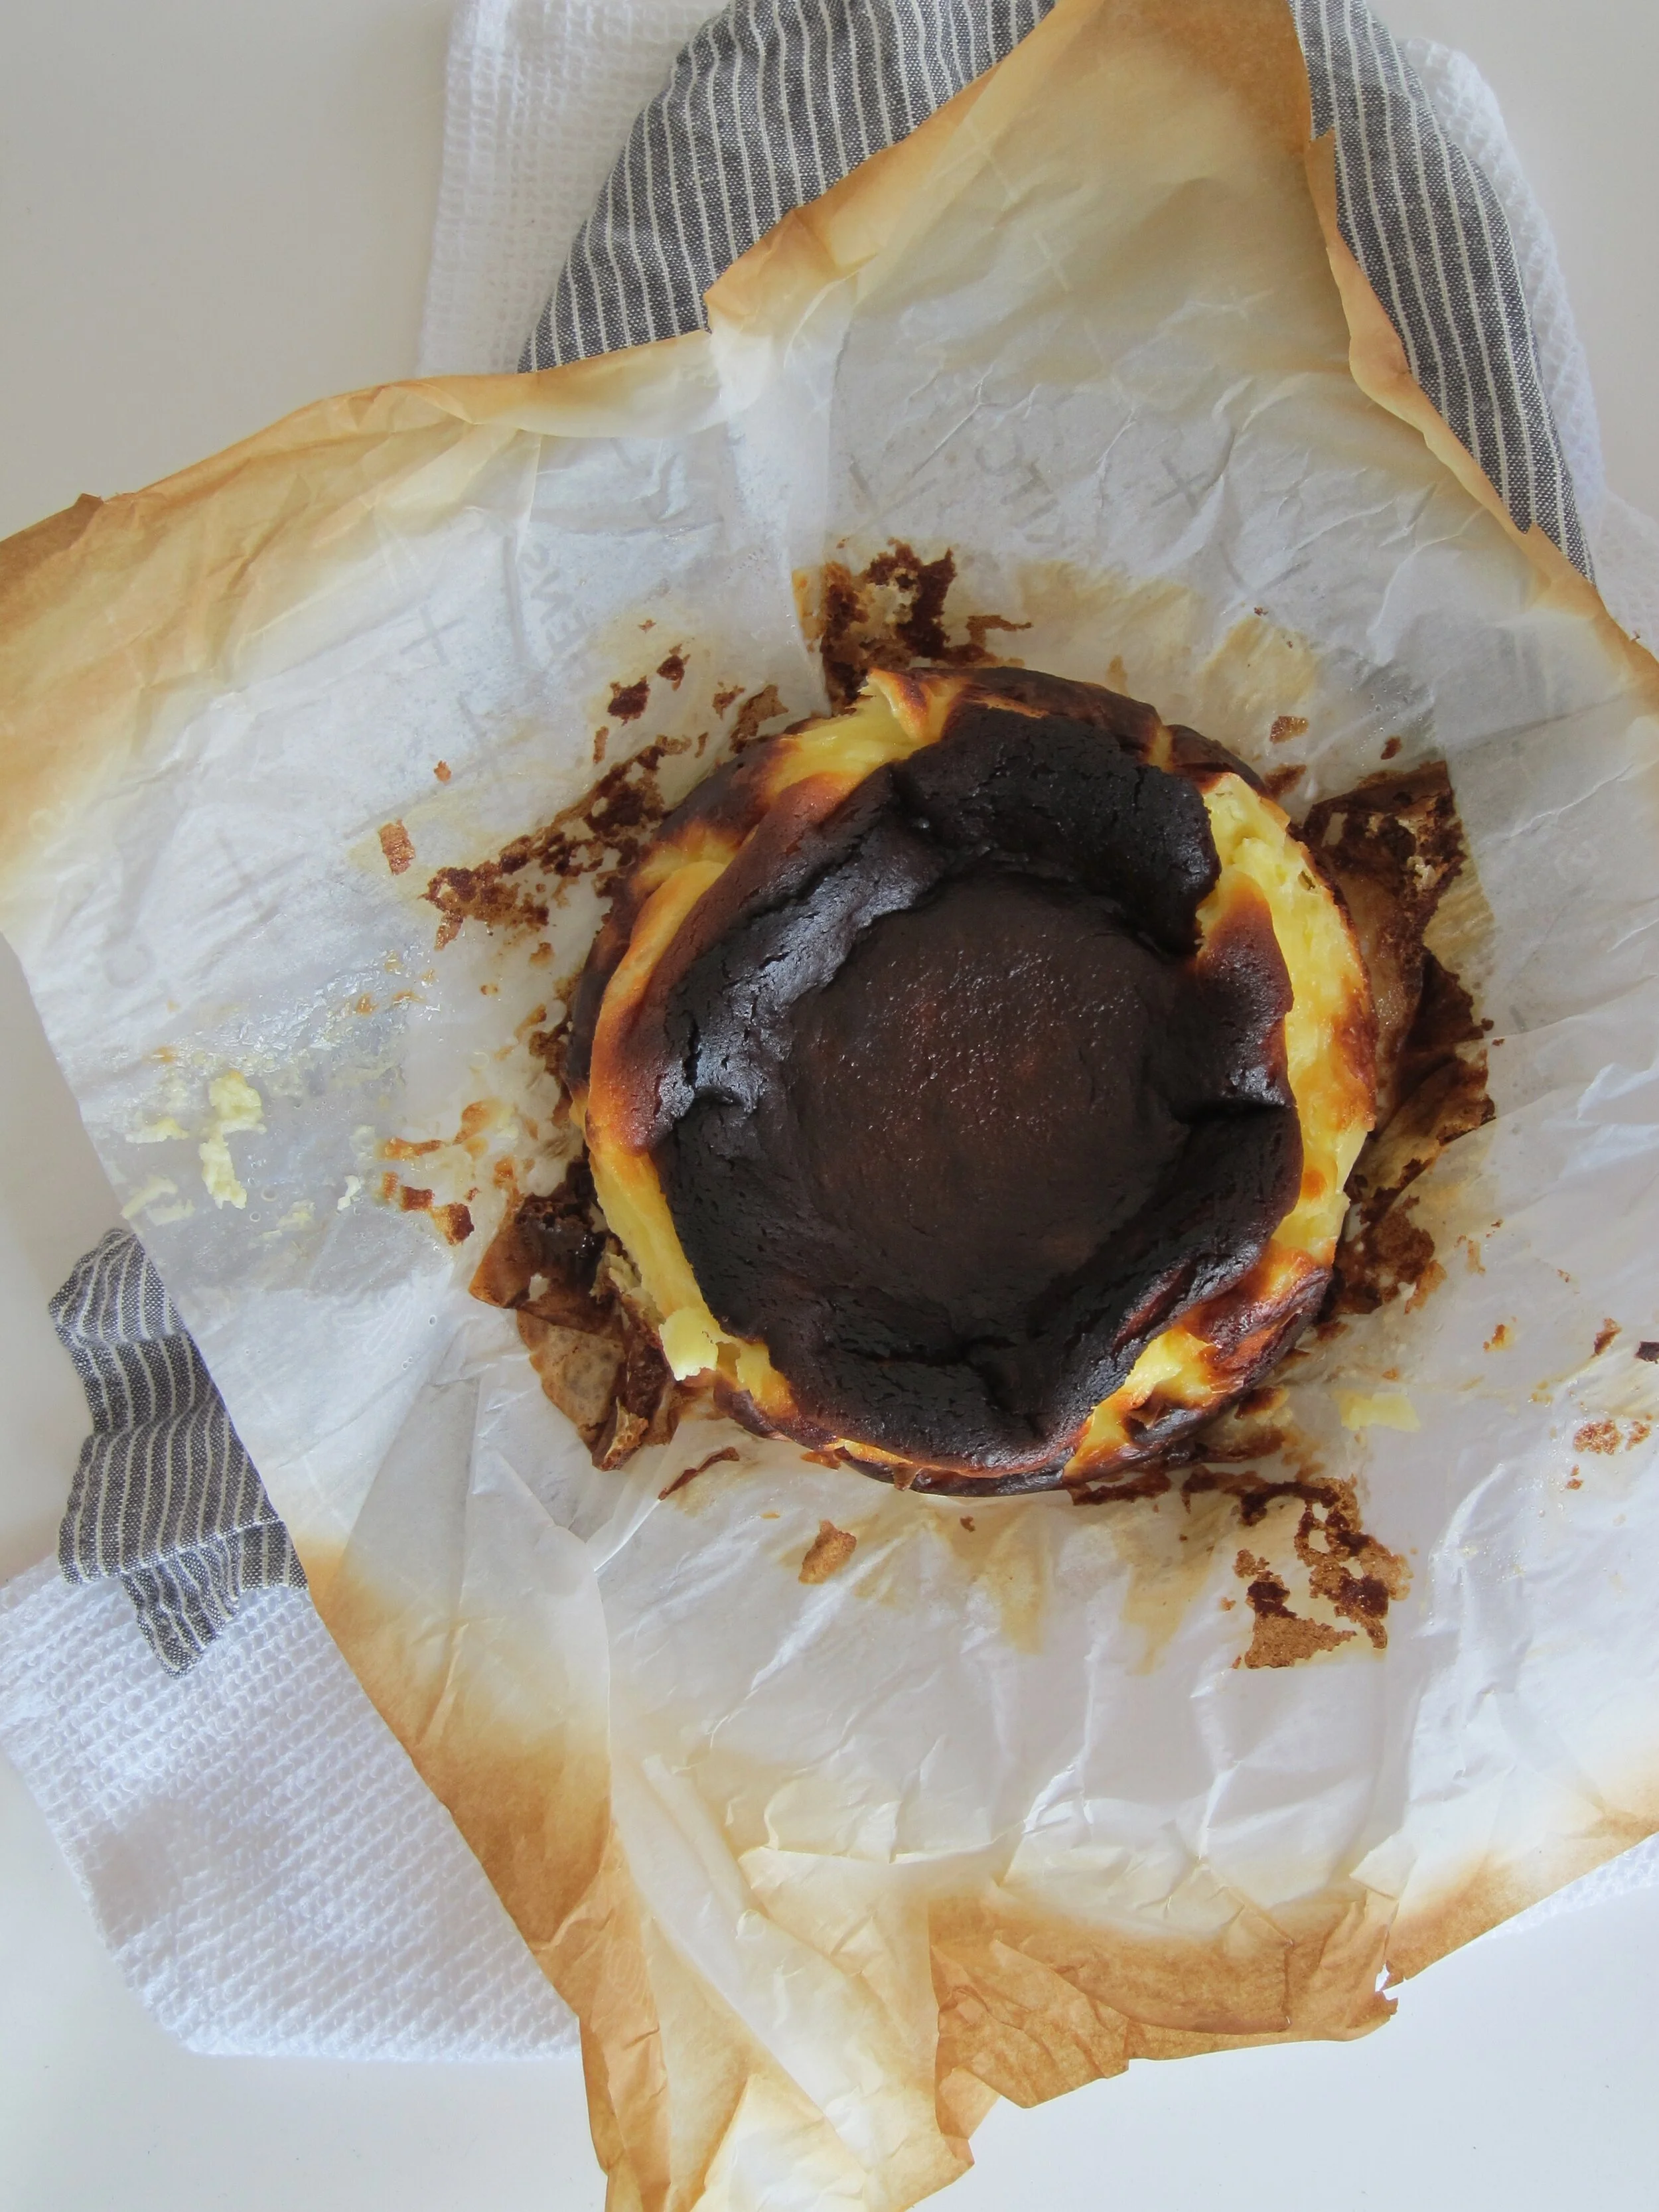
Let me say, I only have admiration for the man churning out these cheesecakes from his tiny kitchen, because they are pretty simple, but still tricky to execute well. Then again, maybe that’s just my oven holding me back. I’ve learned to deal with its quirks, but for a recipe like this, you do want to keep the temperature consistent throughout the bake, and you don’t want to actually burn the cheesecake until the top is carbon. It took me a couple tries to figure it out, but when I did, oh, the perfection! The first try was still edible, even if overcooked, but the second? Wow. The filling was custardy smooth, the top browned just to the edge of burnt, and the flavor was all cream, with a slight tang from the cream cheese and some umami from the burnished top.

Basque Cheesecake
slice of Basque cheesecake
unwrapped cheesecake

Basque-Style Burnt Cheesecake

Adapted from Marti Buckley’s Basque Country via San Francisco Chronicle. The original recipe makes a 10-inch cheese cake, which I pared down to fit a 6-inch cake pan.

  • 1/2 cup sugar

  • 12 oz cream cheese (1 1/2 bricks), softened

  • pinch salt

  • 2 eggs, room temperature

  • 2/3 cup heavy cream, room temperature

  • 4 tsp flour

  1. Heat your oven to 400 degrees and move rack to lowest position. Grease and line a 6-inch cake pan (3 inch tall pan) with parchment paper, leaving a 2-3 inch overhang above the sides of the pan. Pleat the paper as needed to get it to fit the pan, and fold the excess parchment back against the outside of the pan, to prevent it from burning.

  2. In the bowl of a stand mixer with a paddle attachment, beat the sugar and cream cheese together until very smooth. Add the salt and beat to incorporate. Beat in the eggs one at a time, then mix in the cream until you have a smooth, cohesive batter. Sift the flour on top, then gently fold with a spatula to combine.

  3. Pour the mixture into the prepared pan, then bake 30-35 minutes, until it looks almost burned on top. The center should be very jiggly and the top should be puffed like a souffle.

  4. Let cheesecake cool completely in the pan. To serve, gently lift out of the pan with the parchment, and pull the parchment down from the sides. Serve room temperature for the most custard-like texture.

Notes:

  • Many iterations of this cheesecake call for the center to be under baked so as to be almost raw. If that’s what you want, I would pull the cheesecake out at 30 minutes. I found an extra 5 minutes gave the cheesecake a truly burnished look on top and set the center enough so that it’s still custardy, but not like a runny cheese when you slice it.

  • You’ll want to use the best ingredients you can find for this, as is the general rule for recipes with minimal ingredients. The flavor of this cheesecake comes from the cream and the cream cheese, so you want them to taste good! I found good old Philadelphia cream cheese to be the best flavor. You can add in some vanilla if you really want it, but I’d say give it a try first without.

In Recipes Tags Dessert
Comment

Mango Pickle Chicken Wings with Cucumber Yogurt Dipping Sauce

September 8, 2020 Allie
Mango Pickle Chicken Wings with Cucumber Yogurt Dipping Sauce

If I had to pick one cookbook from my shelf to represent my cooking these last few months, it would unequivocally be Priya and Ritu Krishna’s Indian-ish. I was familiar with Priya through her contributions to Bon Appetit and the New York Times Cooking pages, but I somehow held off on buying her cookbook, despite seeing the saag feta recipe take over Instagram, or the Indian-ish Nachos. However, by April I gave in, rationalizing that lockdown was a perfect excuse to buy a new cookbook.

Indian-ish very quickly became a favorite, and I was cooking out of it at least once, but often multiple times per week. I made the saag feta, of course, then kadhi, a yogurt soup, then matar paneer, the whole roasted cauliflower with green pea chutney, the roasted aloo gobhi, kachumber, khichdi, chile peanut rice, lentil dal, and I’m sure I’m forgetting more. For me, this is a lot to make in quick succession out of one cookbook!

One of my favorite recipes was one of the few non-vegetarian dishes in the book, the Achari Fish. The recipe has you marinate filets in the spicy, salty condiment mango achar, or mango pickle. The fish was crazy good, but then I was left with half a jar of mango pickle. The flavor of it reminded me somewhat of the acidic, salty, spicy tang of buffalo sauce, and I had the idea that it would be a great coating for chicken wings.

Well, I’ll just skip to the point and assure you that yes, this was a great idea! I prepared and baked the chicken wings the same way I did in one of my very first recipes, drying them out in the fridge overnight, then baking on a wire rack. Then, I coated the hot wings in a puree of the mango pickle, and served them with a cooling, refreshing cucumber yogurt dipping sauce. I won’t admit the exact number of these wings that I ate in one sitting, but just know it was too many. These are that good!

If you love Buffalo wings, you will love these, I promise!

Dipping chicken wings in sauce
making mango pickle sauce.jpg
tossing chicken wings.jpg
Plate of Mango pickle wings
Mango pickle chicken wings

Mango Pickle Chicken Wings with Cucumber Yogurt Dipping Sauce

Mango Pickle can be easily found online or at your local Indian grocer. Just be sure to not buy the sweet variety.

For the mango pickle wings:

  • 1 egg white

  • 1 tsp salt

  • 1/2 tsp baking soda

  • 1 1/2-2 lbs chicken wings

  • 1/2 jar (10 oz) mango pickle (not sweet)

  • water, to thin

For the Cucumber Yogurt dipping sauce:

  • 1/2 cucumber, seeded

  • 1 cup yogurt, plus more, as needed

  • 1/4 tsp salt

  • 1/2 tsp sugar

  • 1/4 tsp cayenne

  • 1/2 tbs cumin seeds, toasted

  • cilantro, for garnish (optional)

  1. Lightly grease a wire rack (like a cooling rack) and place on a foil lined baking sheet. Whisk together egg white, baking soda and salt. Toss the wings in this mixture to completely coat, and then place on the wire rack. Let sit overnight in the refrigerator, uncovered, so the skin can dry out.

  2. When you are ready to bake the wings, take your baking sheet of wings out of the refrigerator, at least 30 minutes prior to baking. This is a good time to preheat the oven to 450 degrees.

  3. Bake the wings for 20 minutes, then flip and bake 10 minutes more.

  4. While the wings are baking, prepare the mango pickle sauce. In a blender, combine the mango pickle and enough water to create a smooth sauce. I found the right amount to be what was needed to rinse out the jar, but start with a little and gradually add. Set aside.

  5. Prepare the dipping sauce: add all ingredients to a blender and puree until smooth. Transfer to a bowl and whisk in more yogurt as needed to reach your desired consistency. Cucumber has a lot of water in it, so depending on the yogurt you use, you may need to add a little more to get it to that dipping sauce consistency. Taste and adjust salt if needed, but don’t go crazy on the seasoning here, you want this to complement the spicy, salty wings!

  6. Once wings are finished baking, toss the hot wings in the mango pickle sauce, then bake 5 more minutes to finish and “set” the sauce a bit.

  7. Serve hot with the dipping sauce, garnish with cilantro if using.

In Recipes Tags Sides & Appetizers
Comment

Plum & Ginger Caramel Cake

August 28, 2020 Allie
plum and ginger caramel layer cake

Remember how I was done with baking?

Hahahahaha. Have I met me?

Ironically, it was that very cake recipe that lured me back into the kitchen! It’s just so, so good. So I got in the mood to make a layer cake, and of course, it’s stone fruit season so plums got involved.

Actually, this cake is full of familiar recipes! There’s the white mountain cake base, along with Stella’s Marshmallow Buttercream to go with, which I’ve never written about here but have shared on Instagram (one of my crazier moments!). The great thing about that frosting is that, while it takes a little more patience and time than other frostings, it doesn’t have the eggy taste that swiss meringue buttercream can sometimes have, and it can hold a good amount of liquid flavorings, meaning it’s infinitely adaptable. And the liquid I added was a plum caramel, from the same base recipe I used on a tart way back in 2017.

The plum caramel is really special. Adding in the plum puree instead of cream doesn’t make the end result taste especially like caramel, but gives the sweetened fruit a depth of flavor that just adds a little something more. The ginger gives everything just a little more zing. It’s perfect paired with the sweeter frosting here, and the plain vanilla of the cake lets the plums shine through as the star. Plus, how pretty is that pink?

This cake was a good reminder of how to find calmness in the kitchen, but also to just remain calm in the kitchen! It is a project, for sure, with all the various components, but I was not thinking of the news or anything, which was a nice break. I did, however, unfortunately decide to make a cake, and more specifically, buttercream in a heatwave, so my initial finished frosting was soup, basically. But I did not panic! Butter, as always, will firm up when it’s cold. My kitchen was sweltering from having the oven on, but I still have a fridge, so my buttercream got some time in the AC I was wishing for, and all turned out well.

plum caramel layer cake
plum and ginger cake.jpeg
slice of plum cake.jpeg
plum caramel layer cake
plum cake top view

White Cake with Plum & Ginger Caramel and Plum Buttercream

Adapted from Stella Parks’ White Mountain Cake and Marshmallow Buttercream

For the buttercream:

  • 1 1/8 tsp powdered gelatin (1/2 envelope)

  • 2 tbs cool water

  • 1/2 tbs vanilla

  • 3/8 cup (3 oz) water

  • 1/4 cup + 3 tbs corn syrup

  • 1 cup sugar

  • 1/4 tsp kosher salt

  • 2 1/2 sticks unsalted butter, room temp

  • 1/4 cup plum & ginger caramel, recipe below

For the plum & ginger caramel (adapted from Food52):

  • 3/4 lb ripe, red plums, pitted and cut into wedges

  • 1 lbs lemon juice

  • 1 inch ginger, peeled and minced

  • 1/2 vanilla bean

  • 3/4 cup sugar

For the cake:

  • 2 cups bleached cake flour

  • 1 stick unsalted butter, room temperature

  • 1/3 cup coconut oil, room temperature

  • 1 cup plus 2 tbs sugar

  • 1 1/4 tsp baking powder

  • 1/2 tsp baking soda

  • 3/8 tsp kosher salt

  • 4 egg whites, room temperature

  • 1 tbs vanilla

  • 1 cup buttermilk, room temperature

  1. Make the marshmallow buttercream base: mix the gelatin powder, 2 tbs water and vanilla in a small bowl and set aside to bloom. In a pot over medium heat, combine the 3/8 cup water, corn syrup, sugar and salt. Stir with a fork until it bubbles, about 5 minutes, and then turn up the heat to medium-high. Let sit on the heat without stirring until the temperature reaches 250 degrees (see note).

  2. Transfer the sugar syrup to the bowl of a stand mixer, scraping out of the pot (be careful!). Let cool to 212 degrees, then add the bloomed gelatin. Using the whisk attachment, stir on low speed until the gelatin is fully melted into the syrup, then increase speed to medium high and whip the syrup until tripled in volume and thick, snowy marshmallow fluff, and the mixture starts to cling in a ball shape around the whisk. Scrape this mixture into a well greased 2-cup container and cover (grease the lid!) and set aside at room temperature for at least 2 hours.

  3. While marshmallow base is resting, make the caramel and the cake: add the plum wedges, lemon juice, and ginger to a blender and puree until very smooth. The plums should be ripe enough that no extra water is needed. Cut the vanilla bean in half lengthwise and scrape out the seeds.To a medium pot, add the seeds of the vanilla bean and the pod and the sugar, with 1/2 cup water. Bring to a boil, without stirring, and let cook until the mixture turns a deep amber, start checking for color at 10 minutes. Slowly whisk in the plum puree (it will bubble up!) and keep whisking until everything is combined and any hardened sugar has dissolved. Keep cooking over high heat until mixture thickens a bit, about 5 minutes more. Transfer to a bowl and set aside to cool completely.

  4. Make the cake: Heat oven to 350 degrees and line 3, 6-inch cake pans with parchment and grease the pans (or if you don’t have three pans, prepare 2 and bake in batches). In a bowl, sift the cake flour and set aside.

  5. To the bowl of a stand mixer, add butter, coconut oil, sugar, baking powder, baking soda, and salt and mix until with the paddle attachment on medium speed until fluffy, about 5 minutes. Add the egg whites and beat to fully combine, then add the vanilla.

  6. With mixer on low speed, add the 1/3 of the flour mixture and 1/3 of the buttermilk in alternate batches, starting with the flour and ending with the buttermilk. Divide batter between baking pans and bake 13-15 minutes, until golden on top and toothpick inserted in the middle comes out clean. Remove from pans and let cool completely on a wire rack.

  7. While cake layers are cooling, finish the buttercream: transfer the marshmallow base to the bowl of a stand mixer and begin to whip on medium with the whisk attachment. Slowly add the butter, 1 tablespoon at a time, waiting for each to incorporate before adding more. The mixture will loosen up as you go but will look awful at first, keep going! Once all the butter is incorporated, whip for another minute, scraping the bottom as needed to make sure you get all the butter combined with all the marshmallow. Add in the cooled plum caramel and whisk to fully combine.

  8. At this point, your buttercream should hopefully be thick, yet light and creamy. However, there’s a good chance it seems a little soupy, if your kitchen is very warm. Just refrigerate the bowl for 15 minute increments, whipping in between, until the buttercream is the right consistency.

  9. Assembly! Level your cooled cake layers, and frost the bottom layer with the buttercream. Using an offset spatula, create a shallow well in the center of the frosting and fill with more of the plum caramel. This creates a dam so the caramel doesn’t leak out the sides of the cake. Top with a second cake layer and repeat. Top with the third cake layer, and frost and decorate as desired!

Notes:

  • I really recommend using a digital thermometer that you can clip to the side of the pot or bowl for this recipe. The temperature and timing is crucial so you don’t want to be guessing with a regular candy thermometer.

In Recipes, Allie Dreams of Cake Tags Dessert
Comment
← Newer Posts Older Posts →

For those who plan their next meal while eating the last.


INSTAGRAM

🎶When pizza’s on a bagel*, you can have pizza anytime**!🎶

*donut
** after you fry some donuts
FINALLY perfected these Burnt Honey Butter Biscuits & what good timing! It’s carb season & we are all hibernating! 🐻
Final thoughts on Small Thanksgiving: take your sweet potato + marshmallow combo firmly into dessert or even breakfast, and consider a cozy mashed potato soup with stuffing croutons to use up those leftovers. Stay safe & Happy Thanksgiving! 😷🦃
Part 2 of Small Thanksgiving: all the stuff to stuff yourself with! An Italian sausage pasta-inspired stuffing and a vegetarian, spiced wild rice stuffed squash. Everything serves 4-6, gather safely this year! 😷🦃 #thanksgiving #smallthanksgiving #v
Now that we (and the world?) can let out that collective sigh of relief, I can  finally think about my favorite holiday! Everyone is probably (hopefully 😷)looking at smaller gatherings this year, so I’m sending some Small Thanksgiving ideas ou
So happy Disney keeps justifying my dumb baking purchases! This matcha shortbread is delicious, but make a good sandwich cookie it does not. I hid all the broken pieces 🙈
Subscribe to Tea and Fog!

RECENT RECIPES

Featured
polenta with rosemary and goat cheese.jpeg
Salmon Wellington and Warm Rice Salad.jpeg
Pizza Donut Hero.jpeg
Burnt Honey Butter Biscuits.jpeg
Mashed Potato Soup with Stuffing croutons.jpeg
sweet potato donuts with marshmallow frosting.jpeg